Installing Wood Flooring On Ceiling

Related Images about Installing Wood Flooring On Ceiling
Wood Ceiling 101: How To Install Tongue & Groove Paneling – DIYdiva
Wood flooring can be installed by yourself or you’ll be able to take the help of a contractor for installing as well as finishing wood floors. Laminate flooring appear to be much the same in looks to genuine wood floors but are typically less costly and in certain ways being more durable, and also with distinctive finishes and bevelling avenues this particular sort of flooring can certainly still give a true wood appearance at a small fraction of the cost.
How to Install a Reclaimed Wood Ceiling Treatment how-tos DIY
Engineered wood flooring is a much better choice over a solid, because the construction of its adds dimensional stability on the planks. Aged and distressed flooring is also a really practical option for both homes and commercial properties because it keeps looking great for longer. Just having wood floors increases the worth of the home of yours. Wood floors are certainly vulnerable to moisture.
Remodelaholic DIY Plank Ceiling in a Beautiful White Kitchen Renovation in 2020 Tongue and

Laminate flooring are less costly than wood flooring and as well involves less installation time as than a hardwood floor. It can certainly be touched up with a handheld orbital sander rather than industrial floor sanders. The press lock system implies that no matter what size you pick they each will be very easily installed. It’s cheaper, simpler to clean as well as does not call for specialist cutting/trimming (most parts are uniform repeating patterns).
A Tip For The Best Presentation Of Your “Wood-Look” Flooring Wood floor pattern, Laminate

WOOD STOVE INSTALLATION START TO FIRE – YouTube

Interior, Wood Ceiling Panel Fabulous Panels Tube Pattern Hanging Lighting White Fireplace

Bright Basement Remodelling Ideas

Related Posts:
- Wood Floor Modern Kitchen
- Wood Floor Garage Plans
- Real Wood Flooring In Kitchen
- Wood Floor Cork Underlayment
- Streak Free Wood Floor Cleaning
- Solid Wood Flooring White Washed Oak
- Engineered Wood Flooring Durability
- Wood Flooring Types Hardness
- Engineered Wood Flooring Formaldehyde Emission
- Wood Floors For Beach House
Installing Wood Flooring On Ceiling
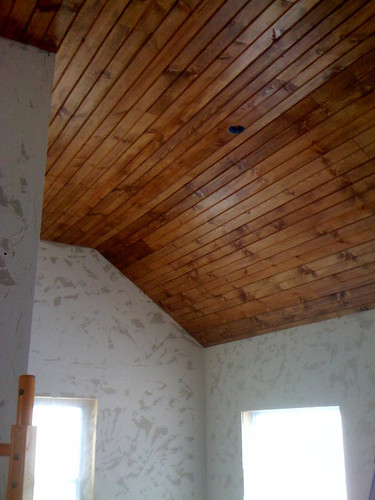
Wood flooring on the ceiling can be a unique and eye-catching addition to any space. It adds warmth, texture, and natural beauty to a room, creating a cozy and inviting atmosphere. Whether you want to add a rustic touch to your home or create a statement piece in a commercial space, installing wood flooring on the ceiling is an excellent choice. In this article, we will guide you through the process of installing wood flooring on the ceiling, from preparation to finishing touches.
Preparing for Installation
Before you begin installing wood flooring on the ceiling, it is important to prepare the area properly. Here are some steps you can follow:
1. Measure the Ceiling: Start by measuring the length and width of the ceiling to determine how much wood flooring you will need. It’s always a good idea to add an extra 10% for waste.
2. Gather Tools and Materials: Make sure you have all the necessary tools and materials for the project. This may include a tape measure, circular saw, drill, level, adhesive or nails, safety goggles, gloves, and your chosen wood flooring.
3. Clear the Area: Remove any furniture or objects from the room that could get in the way during installation. Cover the floor with drop cloths or plastic sheets to protect it from dust and debris.
4. Locate Joists: Use a stud finder or tap on the ceiling with a hammer to locate the joists. Mark their position with a pencil so you know where to attach the wood flooring later.
5. Acclimate the Wood: If your wood flooring has been stored in a different environment, it is important to acclimate it to the room’s temperature and humidity for at least 48 hours before installation. This helps prevent warping or buckling after installation.
Installation Process
Now that you have prepared the area, it’s time to start installing wood flooring on the ceiling. Here is a step-by-step guide to help you through the process:
1. Start with the First Row: Begin by installing the first row of wood flooring along one side of the ceiling, leaving a quarter-inch gap between the flooring and the walls. This gap allows for expansion and contraction of the wood.
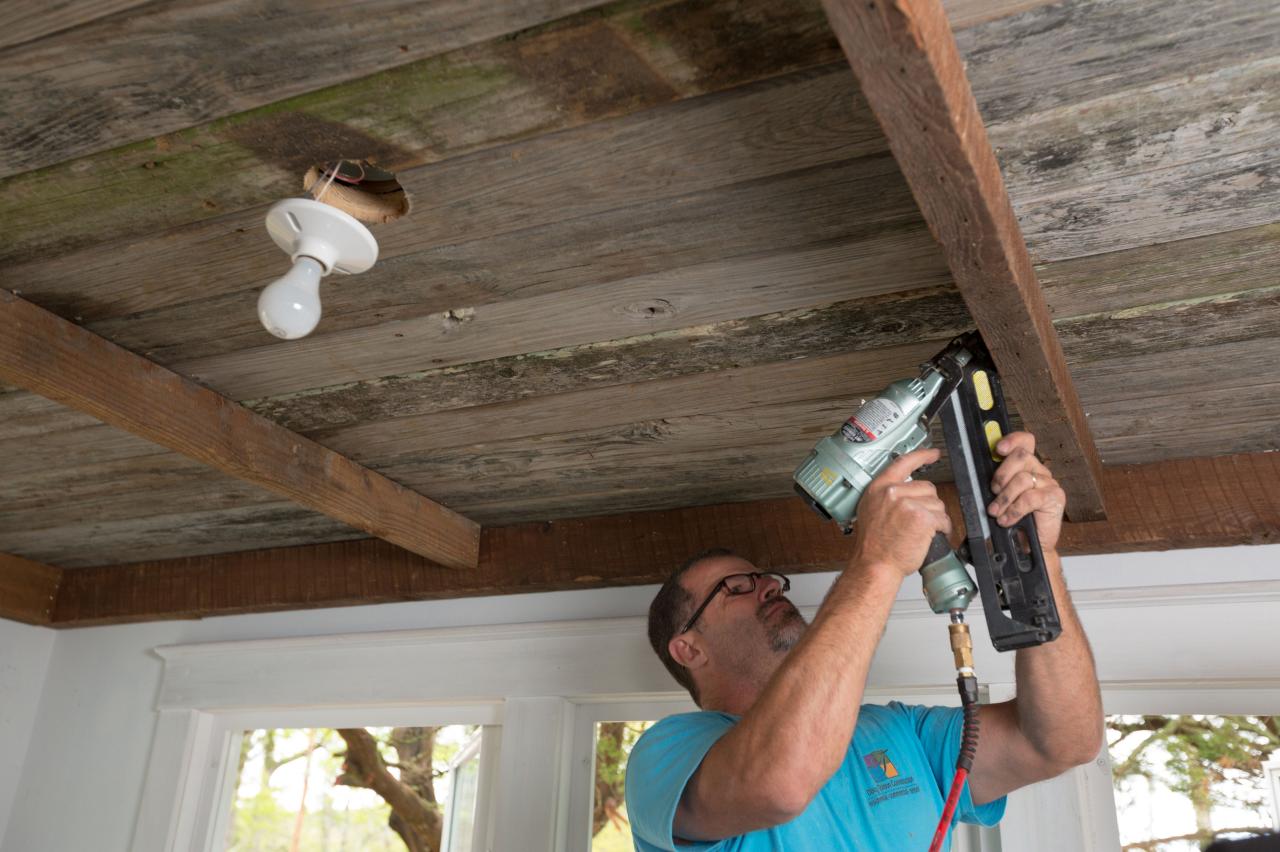
2. Secure the Wood: Attach each piece of wood to the ceiling joists using either adhesive or nails. Follow the manufacturer’s instructions for your chosen method of installation. Make sure each piece is level and securely fastened.
3. Continue Installing Rows: Once the first row is installed, continue adding rows of wood flooring, making sure to stagger the seams for a more natural look. Use a circular saw to cut any pieces that need to fit around vents, light fixtures, or other obstructions.
4. Fill Gaps and Nail Holes: After all the flooring is installed, fill any gaps between the boards with wood filler or caulk. Sand down any excess filler to create a smooth surface. If you used nails, fill in the nail holes with putty and sand them as well.
5. Sand and Finish: Once all the gaps and nail holes are filled, it’s time to sand down the wood flooring to create a smooth finish. Start with a coarse grit sandpaper and gradually move to finer grits until you achieve the desired smoothness. Vacuum or wipe away all dust before applying any finish.
6. Apply Finish: Choose a finish that suits your desired look and level of protection. You can opt for clear polyurethane for a natural look or Stain the wood for a more customized appearance. Apply the finish according to the manufacturer’s instructions, using a brush or roller. Allow the finish to dry completely before moving any furniture back into the room.
7. Clean up: Once the finish is dry, clean up any remaining dust or debris from the installation process. Remove drop cloths or plastic sheets and return furniture to its original position.
8. Enjoy your new wood ceiling: Step back and admire your newly installed wood flooring on the ceiling. Not only does it add a unique and stylish touch to your space, but it also provides insulation and soundproofing properties.
Remember, if you are unsure about any step of the installation process, it is always best to consult with a professional or seek guidance from experts in wood flooring installation. 9. Maintain and care for your wood ceiling: Regularly clean the wood ceiling using a soft cloth or dust mop to remove dust and debris. Avoid using harsh chemicals or abrasive cleaners that can damage the finish. If the wood becomes scratched or damaged, consider refinishing or repairing it to maintain its beauty and longevity. 10. Monitor for any signs of moisture or humidity issues. Wood ceilings can be more susceptible to moisture damage compared to other materials. Keep an eye out for any signs of water leaks or excessive humidity, such as warping or discoloration of the wood. Address any moisture issues promptly to prevent further damage.
11. Consider adding insulation if necessary. Depending on your climate and the desired level of insulation, you may want to install insulation above the wood ceiling to improve energy efficiency and reduce noise transmission.
12. Regularly inspect and maintain the wood ceiling. Check for any loose or damaged boards and repair them as needed. Additionally, periodically check the finish and reapply it if necessary to protect the wood from wear and tear.
13. Be mindful of weight restrictions. Ensure that the structure of your ceiling can support the weight of the wood flooring before proceeding with installation. If in doubt, consult a professional to assess the load-bearing capacity of your ceiling.
14. Take precautions during installation to protect other surfaces and furniture in the room. Use drop cloths or plastic sheets to cover floors, walls, and furniture to prevent damage from falling debris or spills during installation.
15. Consider hiring a professional for installation if you are not confident in your DIY skills or if you have a complex ceiling structure. A professional installer will have the expertise and tools necessary to ensure a proper and efficient installation.
16. Follow all safety guidelines when working at heights or using power tools during the installation process. Use appropriate safety equipment such as goggles, gloves, and knee pads to protect yourself from potential accidents or injuries.
17. Be patient during the sanding and finishing process. Take your time to achieve a smooth and even finish, as rushing can result in an unsatisfactory outcome.
18. Enjoy your new wood ceiling! Take pride in your DIY project and enjoy the beauty and warmth that a wood ceiling brings to your space.