How To Layout Tile Bathroom Floor
Related Images about How To Layout Tile Bathroom Floor
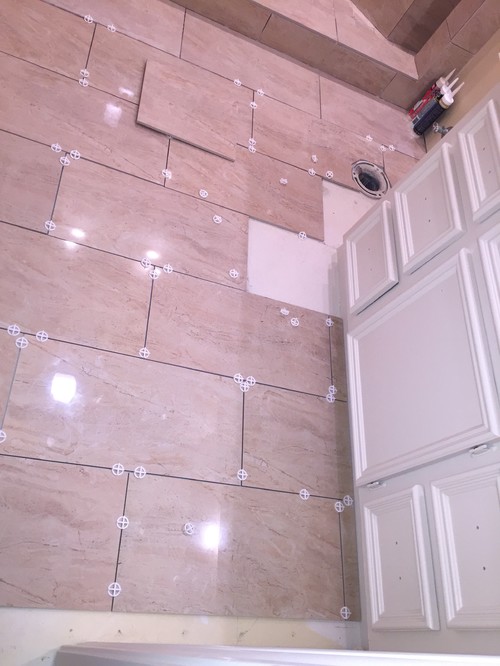
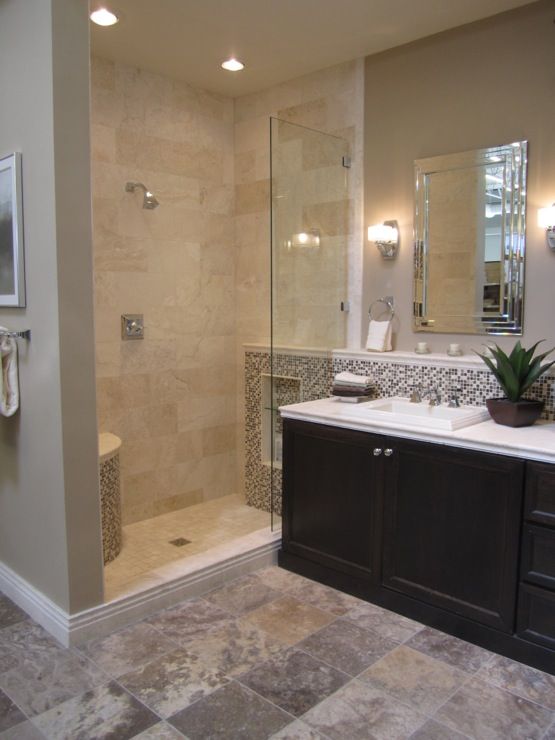
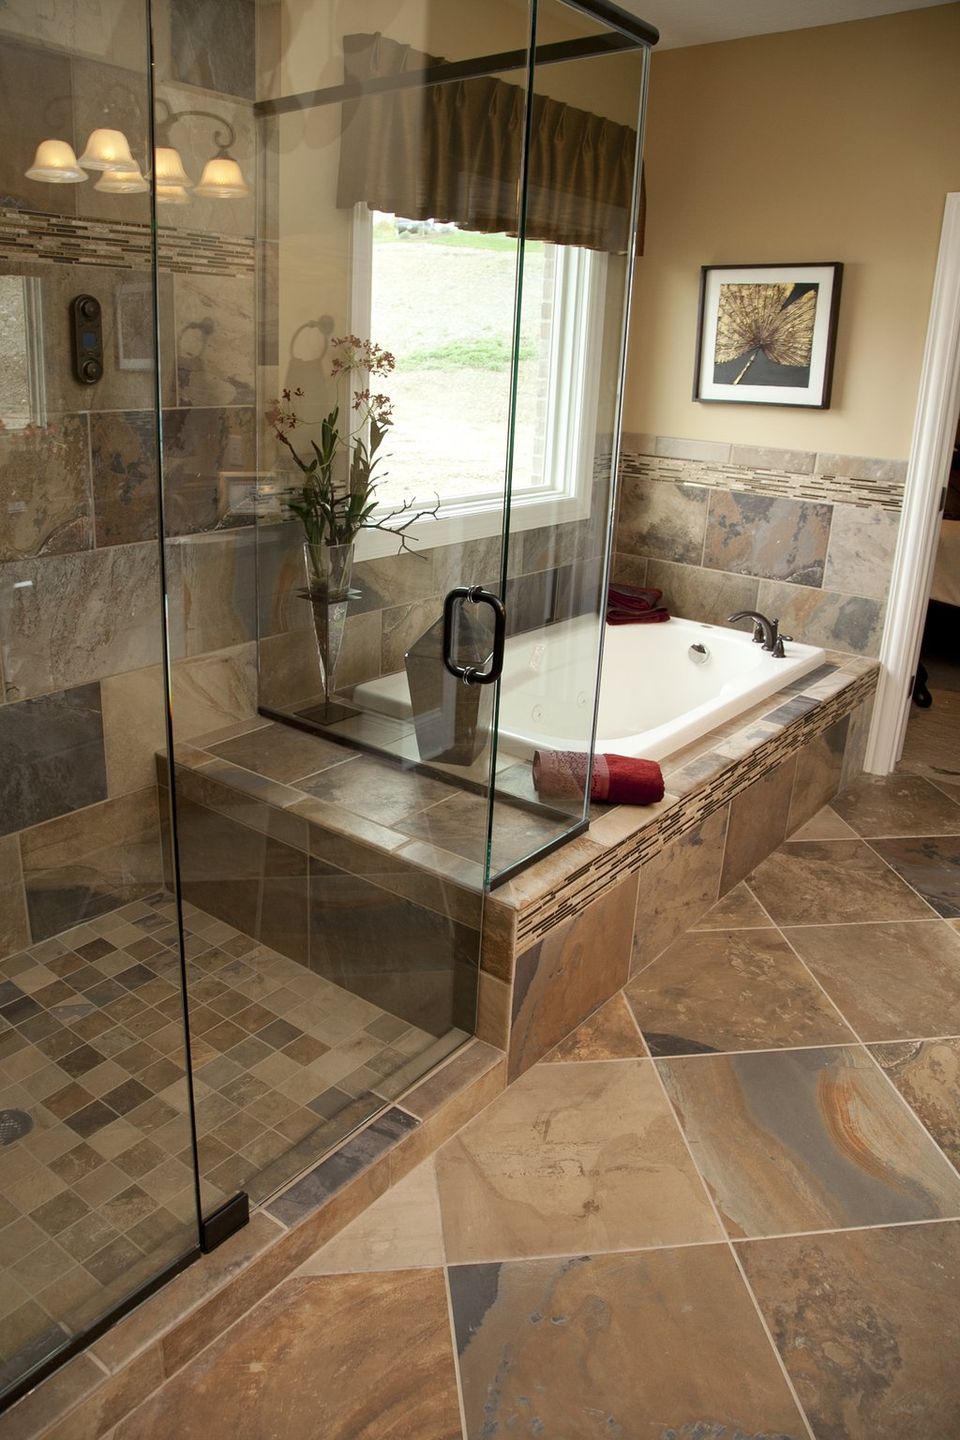
QUESTION OF THE WEEK: “WHAT ABOUT TILE INSTALLATION?” — Mary Anne Smiley Interiors LLC
Add it this the germs as well as bacteria which you get in a bathroom and you are able to see why the flooring takes more of a beating compared to some other rooms. Ceramic tiles are available in an amazing array of styles which are different, designs and sizes, also, making it a snap to obtain the look that’s right for you. It’s likewise essential to look for bathroom flooring as a larger picture.
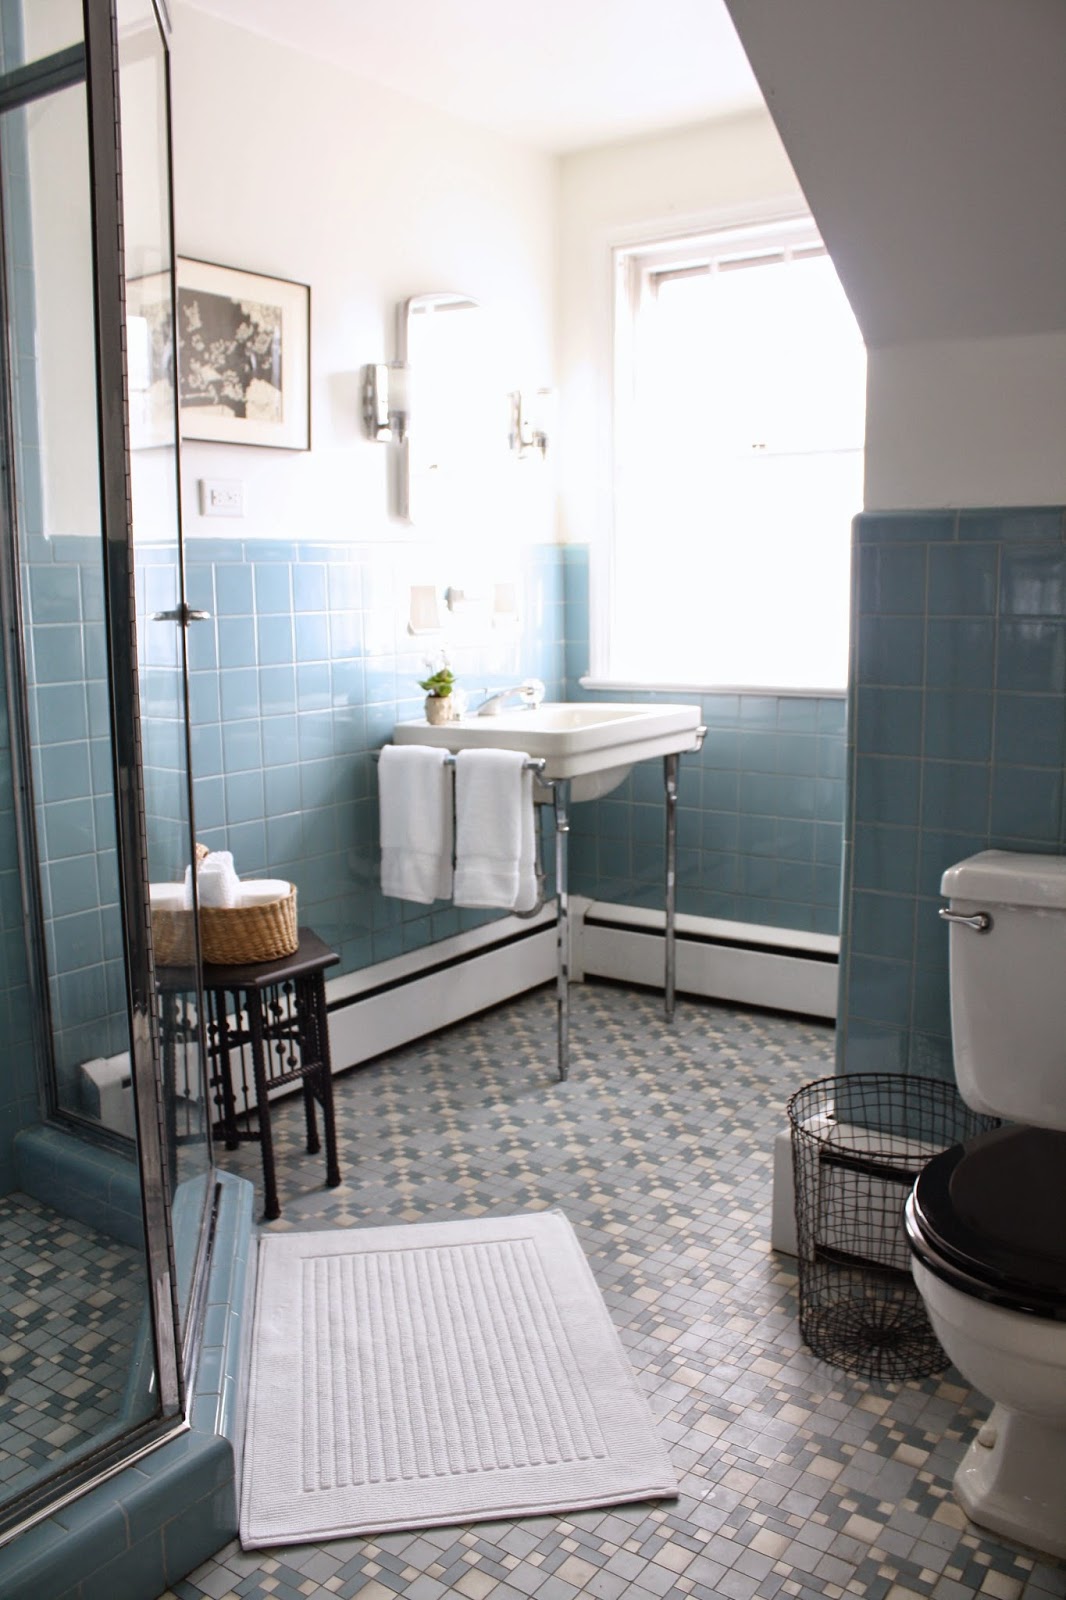
33 amazing pictures and ideas of old fashioned bathroom floor tile
Wood, cork, bamboo, laminates or vinyl are not the optimal flooring choices for the bathroom of yours. Decoration is often the key to attaining this, and one of the most significant elements of any bathroom is utilizing the correct flooring. Bamboo and cork is able to retain moisture and they can become thriving grounds for bacteria along with other microorganisms.
bathroom tiles design images large size of tile tile ideas for small bathrooms small bathroom

Laminate flooring surfaces for the bathroom are surprisingly a good option over carpets and sound hardwood-made floors. At this time there are three challenges that your bath room flooring faces which the floor surfaces in other areas of the home of yours does not need to brace up for – water, weather extremes as well as humidity. Generally different types of tiles are coupled in a single mesh to offer you a diverse mosaic tile.
Bathroom Tiles Archives – BathroomTrends

Desperately need help with bathroom tiles! Houzz AU
12″ x 24″ tiles in a herringbone pattern on the kitchen floor Herringbone tile floors, Kitchen

Home – Bathrooms – Picture Gallery

40 beige bathroom wall tiles ideas and pictures 2020
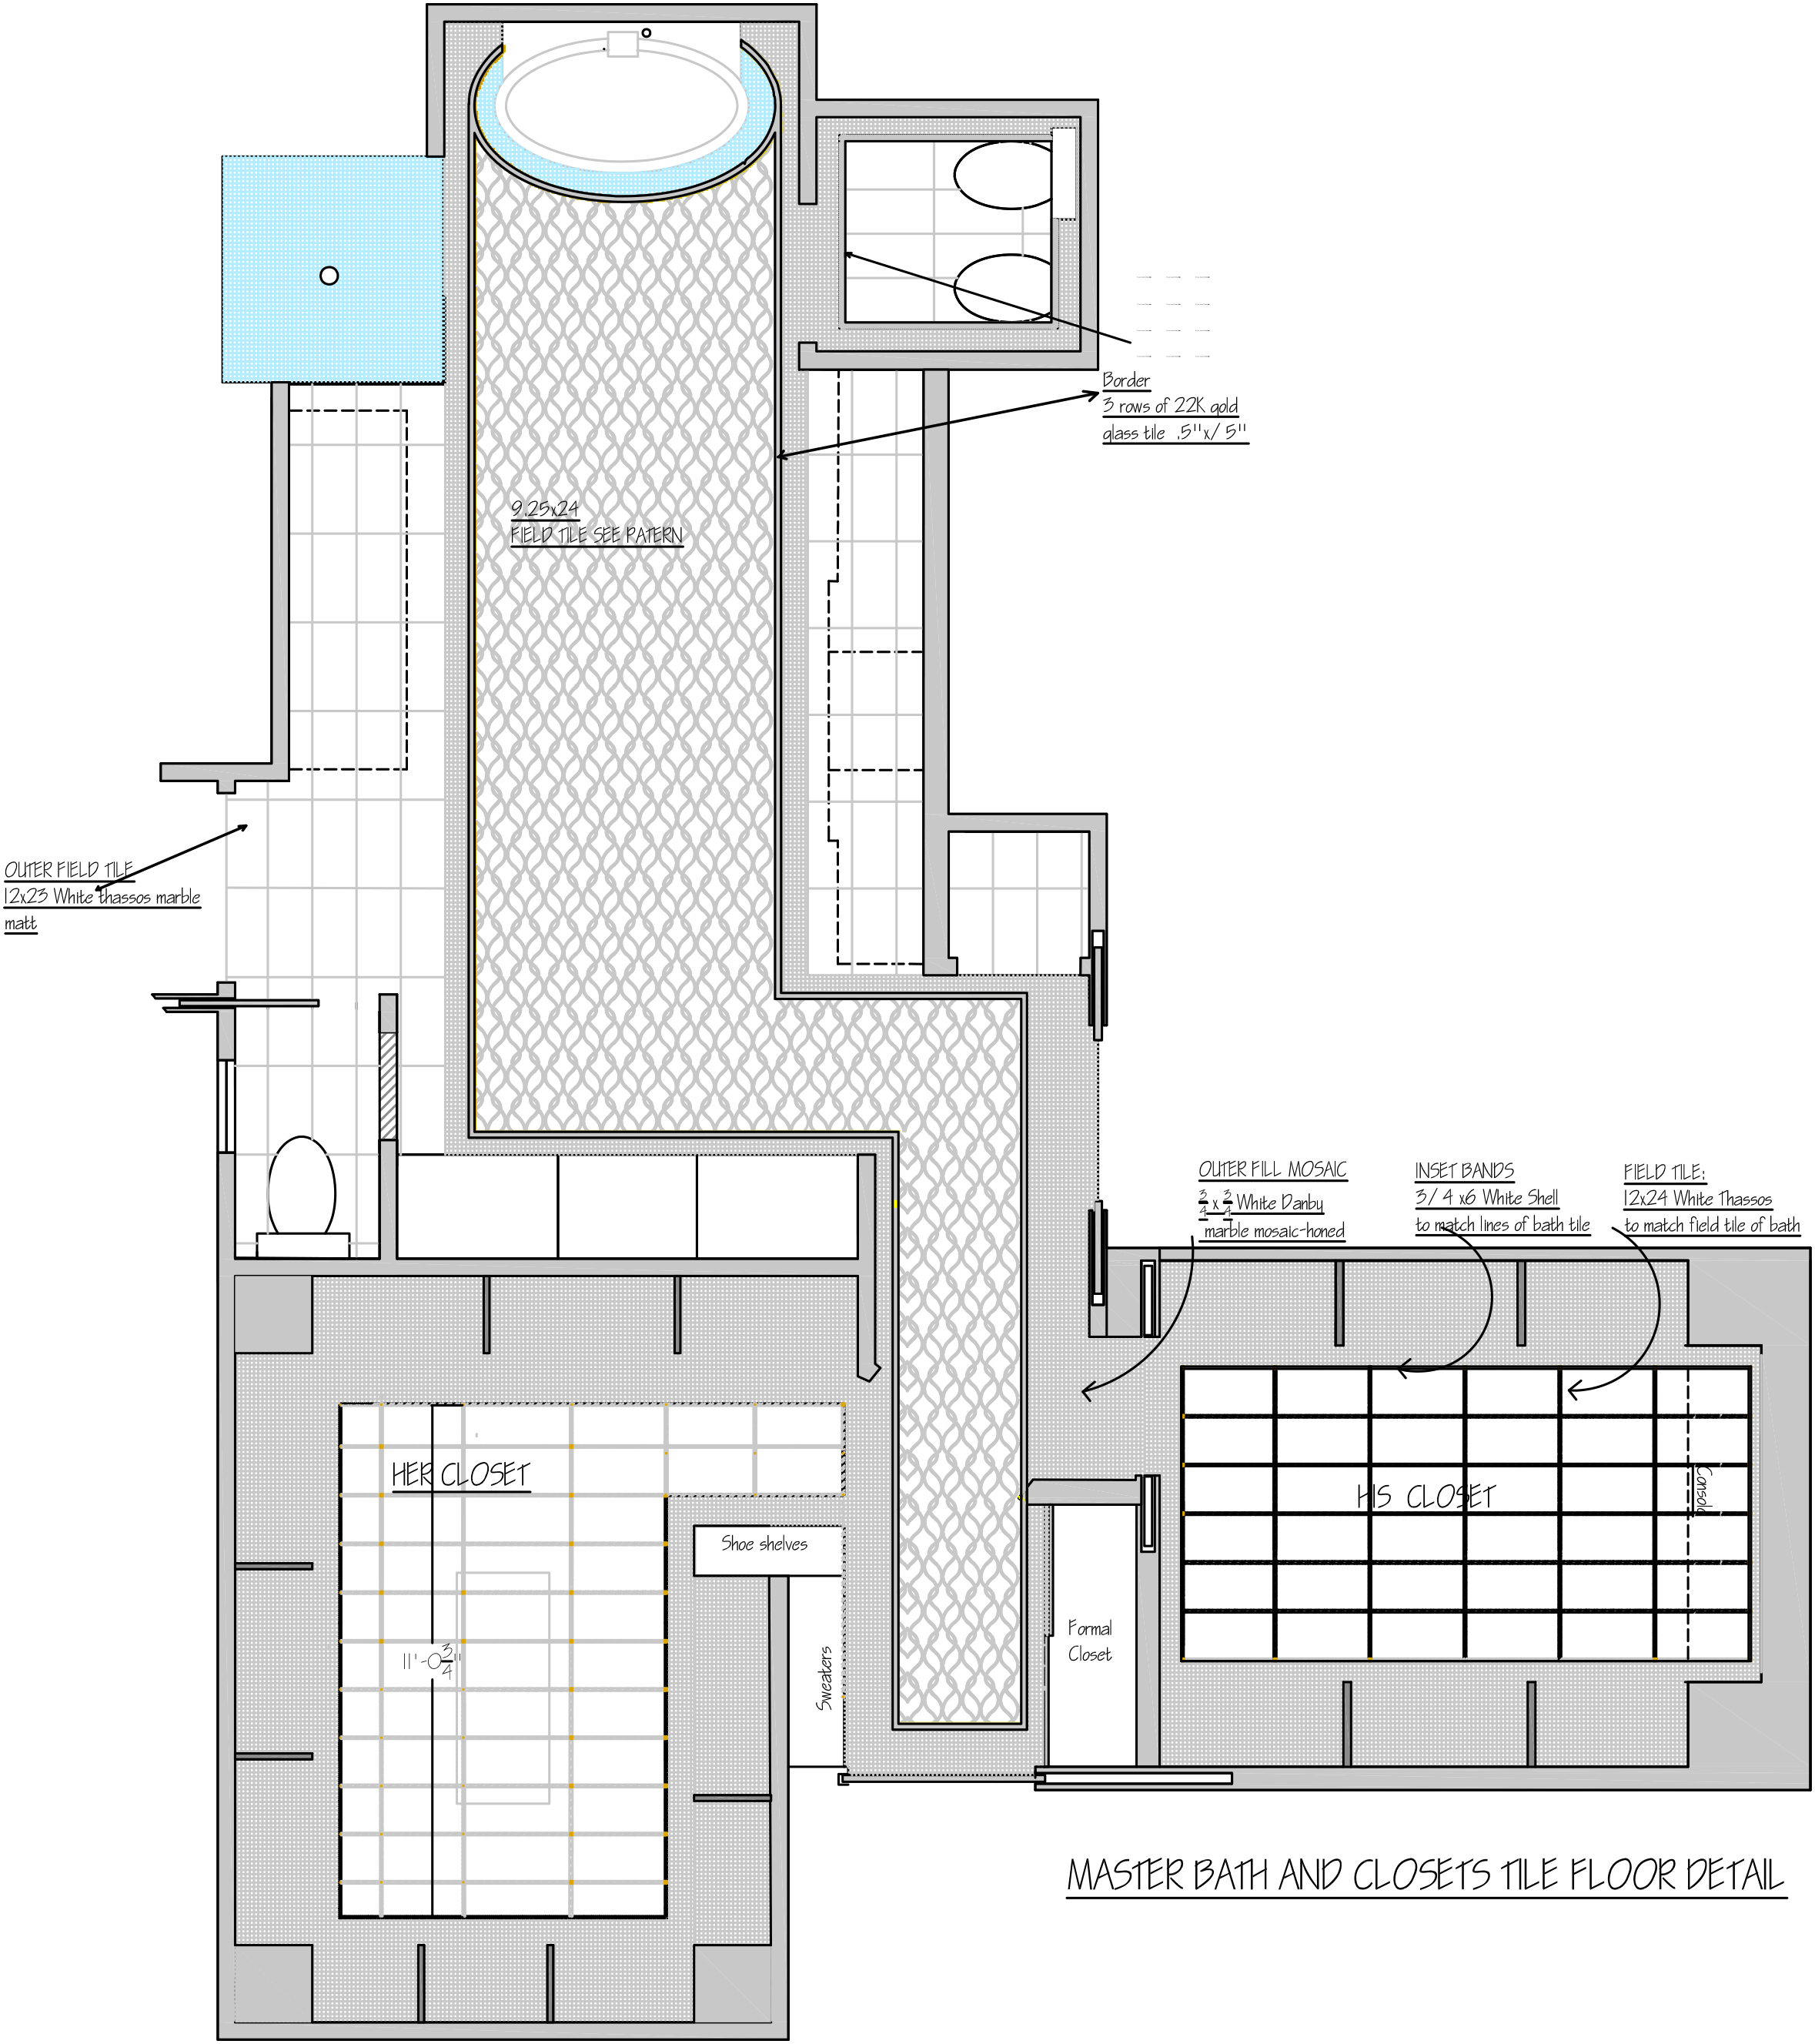
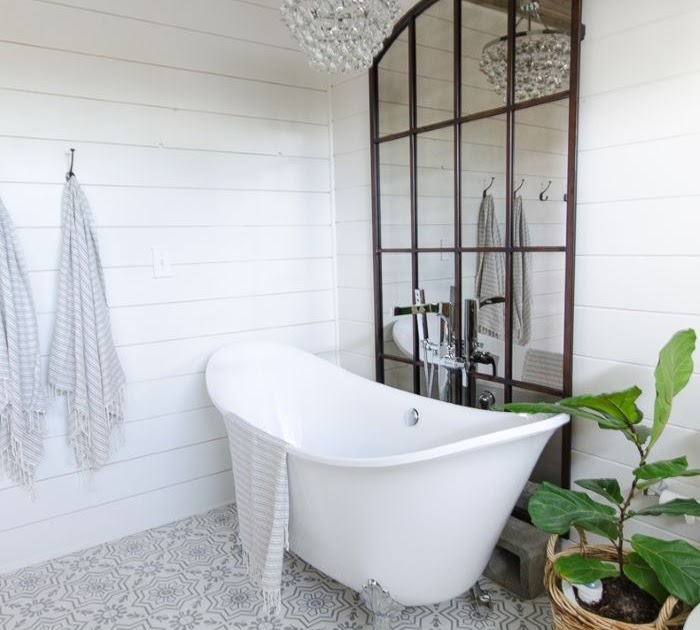
floor plan: Patterned tiles for the floor of a bathroom have been trending for a while now, and
Basement Bathroom Renovation: Design – Chez Nous Toronto
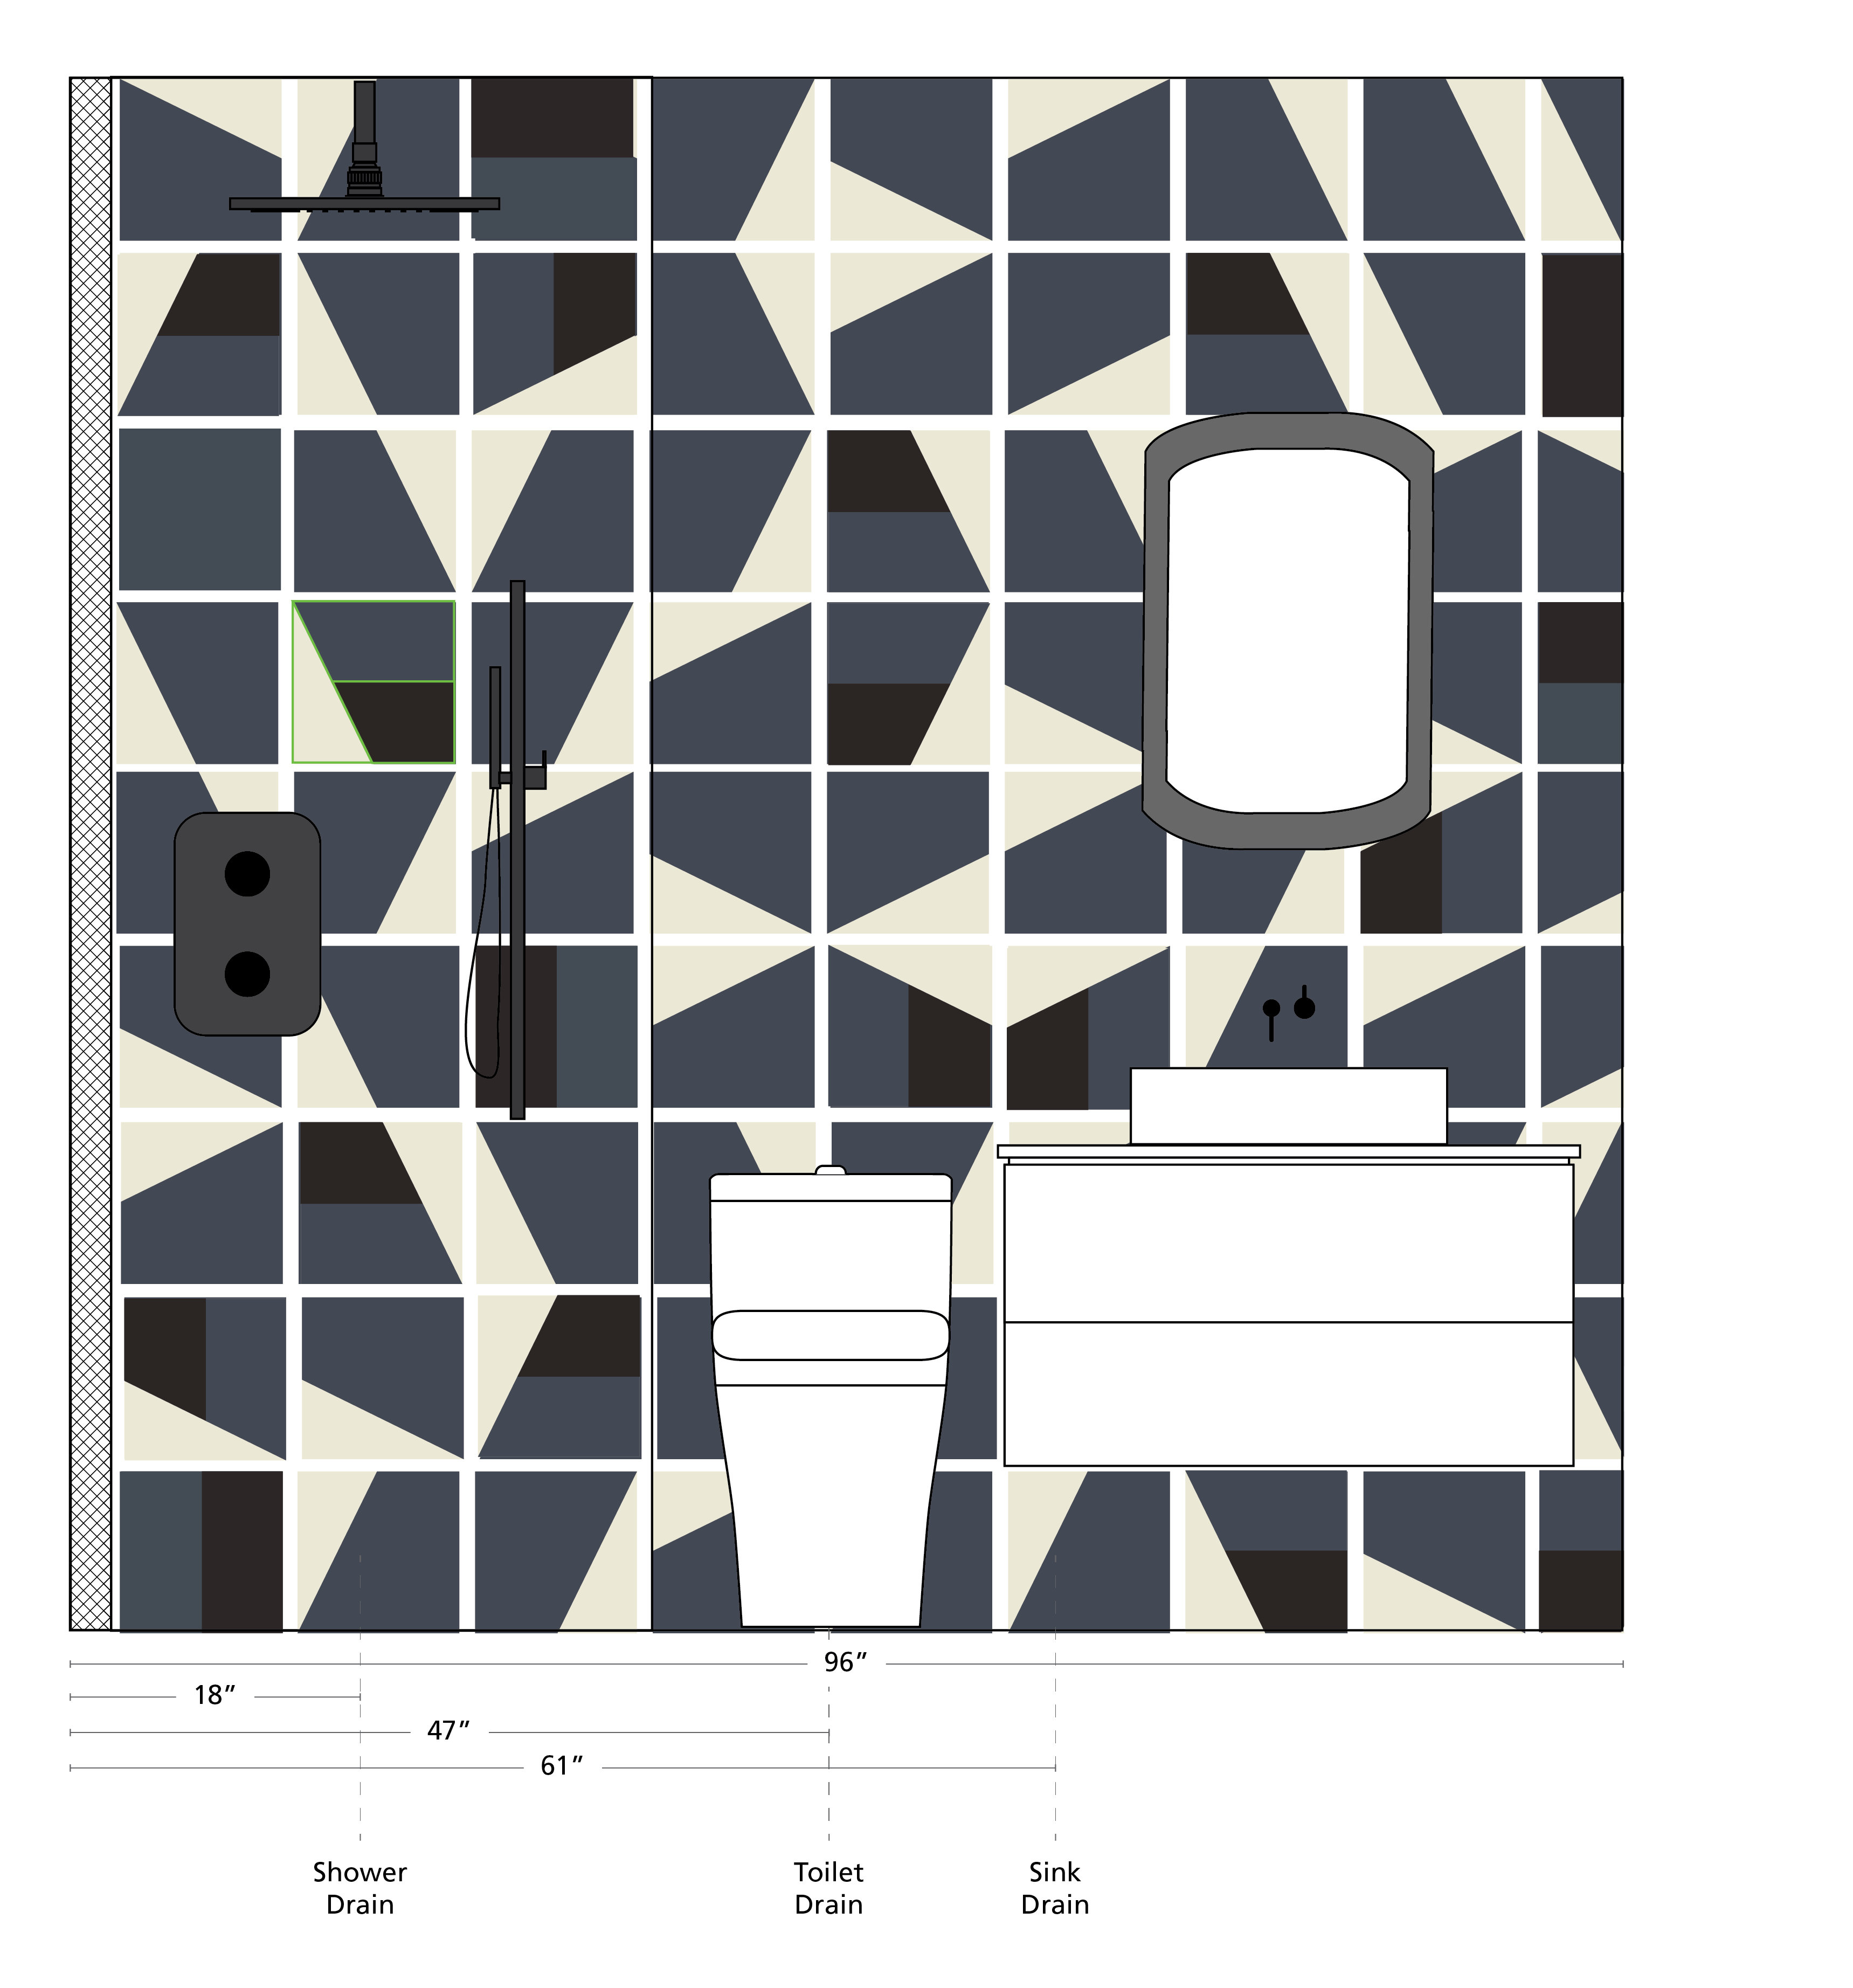
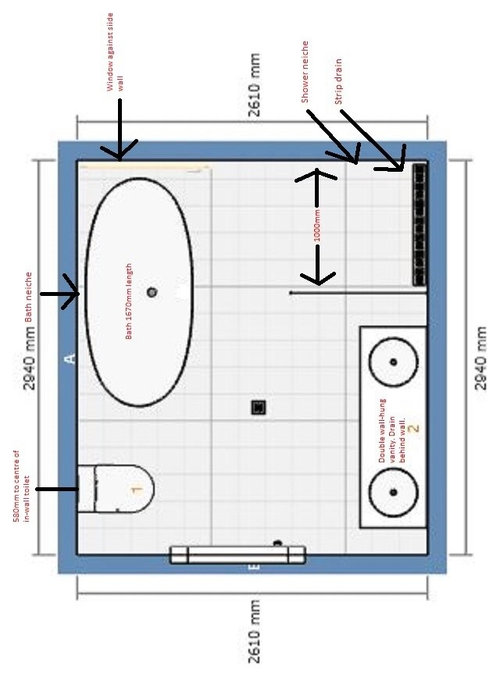
Bathroom tile layout
45+ Lies You’ve Been Told About White Subway Tile Bathroom Dark Grout Paint Colors 111

33 stunning pictures and ideas of natural stone bathroom floor tiles
Related Posts:
- Bathroom Floor Tiles Price
- Cement Tile For Bathroom Floor
- Bathroom Floor Sky Painting
- Caught Me On The Bathroom Floor
- Heated Tile Floor Cost Per Square Foot
- Dirty Bathroom Floor
- Replace Bathroom Floor And Subfloor
- How To Make Bathroom Floor Waterproof
- Easy Bathroom Flooring Options
- Cheap Bathroom Floor Cabinets
When it comes to renovating a bathroom, installing new tile flooring can completely transform the space. Tile floors are not only durable and easy to clean, but they also come in a wide variety of styles and colors to suit any design aesthetic. However, laying tile can be a daunting task for those who have never done it before. In this article, we will provide you with a detailed guide on how to layout tile bathroom floor step by step.
Choosing the Right Tile
Before you begin laying tile in your bathroom, it’s essential to choose the right type of tile for your space. Consider factors such as the size of the room, the amount of foot traffic it receives, and your design preferences. Porcelain and ceramic tiles are both popular choices for bathroom floors due to their durability and water resistance. Natural stone tiles like marble or travertine can add a touch of luxury to your space but require more maintenance.
FAQs:
Q: What size tile is best for a small bathroom?
A: For small bathrooms, it’s best to choose smaller tiles like mosaic or subway tiles. These can help make the space feel larger by creating the illusion of more grout lines.
Preparing the Subfloor
Before you can begin laying tile, you need to ensure that your subfloor is clean, dry, and level. Remove any existing flooring material and make any necessary repairs to the subfloor. If there are any uneven areas, use a self-leveling compound to create a smooth surface for the tile.
FAQs:
Q: Do I need to install cement backer board before laying tile in my bathroom?
A: While cement backer board is not always necessary, it can provide added stability and prevent moisture damage in wet areas like bathrooms. It’s recommended for tiled floors that will be exposed to water regularly.
Creating a Layout Plan
Once your subfloor is prepped and ready, it’s time to create a layout plan for your tile installation. Start by finding the center point of the room and marking it with a chalk line. This will serve as a reference point for laying out your tiles evenly.
FAQs:
Q: Should I start tiling from the center of the room?
A: Starting from the center of the room ensures that your tiles are evenly laid out and symmetrical on all sides. It also helps minimize cutting at the edges of the room.
Dry Fitting Tiles
Before you start applying adhesive, dry fit your tiles on the floor to ensure that they fit properly and create a layout that you’re happy with. Make any necessary adjustments to achieve a balanced look.
FAQs:
Q: How much space should I leave between tiles?
A: The spacing between tiles is determined by grout lines, which can vary depending on tile size and design preference. Typically, spacing between tiles ranges from 1/8 inch to 1/4 inch.
Applying Adhesive and Setting Tiles
Once you’re satisfied with your layout plan, it’s time to start applying adhesive to the subfloor using a trowel. Work in small sections at a time to prevent the adhesive from drying out before you lay your tiles. Press each tile firmly into place, making sure they are level and evenly spaced.
FAQs:
Q: Can I use premixed adhesive for laying floor tiles?
A: While premixed adhesive is convenient, it’s not recommended for heavy-duty applications like floor tiling. Opt for a high-quality thinset mortar instead for better adhesion.
Grouting and Sealing
After all the tiles are set in place and the adhesive has dried, it’s time to grout the spaces between the tiles. Mix the grout according to the manufacturer’s instructions and apply it with a rubber float, pressing it into the joints. Wipe away excess grout with a damp sponge before it dries. Once the grout has cured, seal it with a grout sealer to protect it from moisture and stains.
FAQs:
Q: How long should I wait before sealing grout?
A: It’s recommended to wait at least 48 hours after grouting before applying a sealer. This allows the grout to fully cure and set before sealing.
Cleaning Up
Once the grout sealer has dried, clean up any remaining residue on the tiles with a damp cloth. Inspect your work for any uneven areas or loose tiles that may need adjustment. Allow the tile installation to set for at least 24 hours before walking on it or applying any weight to ensure a strong bond.
Maintaining Your Tile Floor
To keep your newly tiled bathroom floor looking its best, regularly sweep or vacuum to remove dirt and debris. Use a mild detergent and warm water to mop the floor as needed, avoiding harsh chemicals that can damage the tile. Periodically reseal the grout lines to maintain their integrity and prevent water damage.
By following these steps and tips, you can successfully install tile flooring in your bathroom and enjoy a beautiful, durable surface for years to come. If you have any doubts or concerns about your ability to complete this project, don’t hesitate to consult with a professional tile installer for assistance.