Repair Broken Toilet Flange Concrete Floor

Related Images about Repair Broken Toilet Flange Concrete Floor
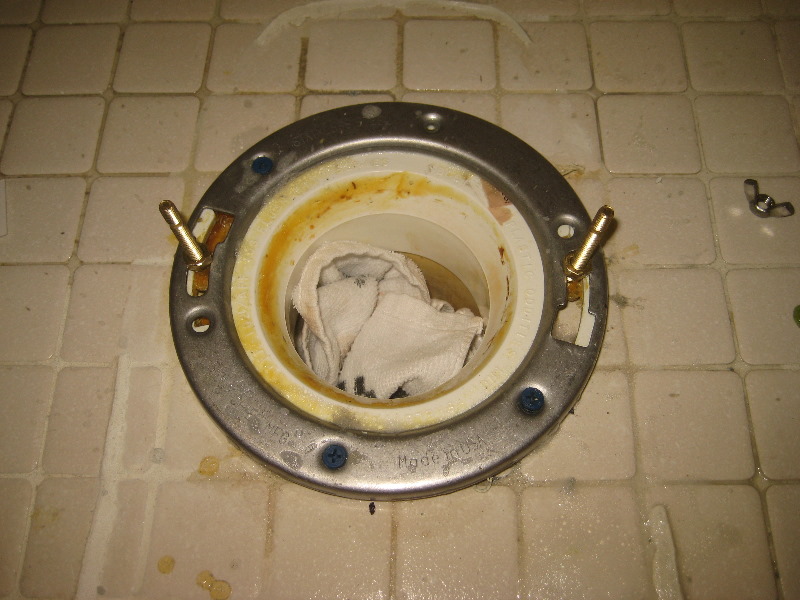
Replacing Toilet Flange Concrete Floor – Vintalicious.net
Wooden floors require varnishing on a regular foundation, carpets can be a nightmare which need to be cleaned regularly, while the concrete flooring surfaces are actually sustainable and don't require some maintenance, other than a washing if needed. At this point washing on a polished concrete floors is much easier and demands less time. Concrete floors might be polished dry or wet.
How To Replace Repair Broken Toilet Flange In Concrete Floor – HOWOTRE
Working with polished concrete floors is a thing that nearly all folks may not be perfectly clued about. Do you have polished concrete floors, or perhaps terrazzo floors? This makes knowing what kind of paint to go with rather easy. Dust, dust and dander mites can all be stopped by utilizing this flooring type.
How To Install A Toilet Flange On Concrete
Damp polishing creates waste slurry which effortlessly transfers into hard-to-find hard to reach locations. On a brand new concrete, stain concrete flooring surfaces making companies advise letting the concrete treatment for at least a month. Along with making polished concrete unbelievably sustainable, concrete is definitely the most inexpensive flooring choice available.
Broken flange — best repair advice? Terry Love Plumbing & Remodel DIY & Professional Forum
How do I concrete under and around a new toilet flange? Terry Love Plumbing Advice & Remodel
Broken-Plastic-Toilet-Flange-Metal-Repair-Ring-Installation-Guide-015
Cast Iron Toilet Flange, low and broken Terry Love Plumbing & Remodel DIY & Professional Forum
Chipped concrete around toilet flange – DoItYourself.com Community Forums

cast iron toilet flange replacement 101 – YouTube

How To Install A Toilet Flange On Concrete – Complete Howto Wikies
Cracked Toilet Flange in Concrete Terry Love Plumbing Advice & Remodel DIY & Professional Forum
Replacing A Toilet Flange In Concrete Floor – How Much?

Self leveling concrete and toilet flange? – DoItYourself.com Community Forums

Install Toilet To Concrete Floor – Carpet Vidalondon

Related Posts:
- Interior Concrete Floor Paint Ideas
- Concrete Floors In Homes Cost
- Level Concrete Floor With Plywood
- Concrete Floor Construction For Underfloor Heating
- Stained Concrete Floors In Basement
- Polished Concrete Floor Crack Repair
- Concrete Floor With Insulation
- Acid Stained Concrete Floors Pictures
- Installing Underfloor Heating On Existing Concrete Floor
- How Much Is Concrete Flooring
Repairing a broken toilet flange on a concrete floor can seem like a daunting task, but with the right tools and a little know-how, it can be done. The toilet flange is an essential component of any toilet installation as it connects the toilet bowl to the drainpipe and ensures a secure and leak-free connection. When the flange breaks, it can lead to leaks, wobbling toilets, and even structural damage to your bathroom floor. In this article, we will guide you through the process of repairing a broken toilet flange on a concrete floor, from identifying the problem to implementing the solution.
1. Identifying the Problem:
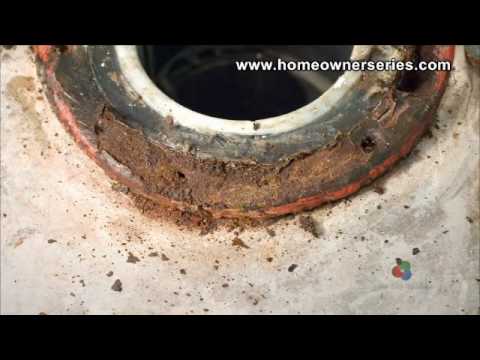
The first step in repairing a broken toilet flange is identifying the problem. Common signs of a broken flange include water leakage around the base of the toilet, a loose or wobbly toilet bowl, or visible cracks in the flange itself. To confirm if the flange is indeed broken, you can remove the toilet bowl by unscrewing the bolts at its base and inspecting the condition of the flange.
FAQ: How can I tell if my toilet’s flange is broken?
Answer: You can check for signs such as water leakage around the base of the toilet, a loose or wobbly toilet bowl, or visible cracks in the flange itself. If you are unsure, removing the toilet bowl will allow you to inspect the condition of the flange more closely.
2. Gathering Materials and Tools:
Once you have confirmed that your toilet’s flange is broken, it’s time to gather all the necessary materials and tools for the repair. You will need a new toilet flange, wax ring, adjustable wrench, screwdriver, hacksaw or reciprocating saw (if removing old flange), hammer drill with masonry bit (if installing new anchor bolts), epoxy adhesive (optional), and concrete patching compound.
FAQ: Can I use an epoxy adhesive to repair a broken toilet flange?
Answer: While epoxy adhesive can be used as a temporary fix, it is not recommended for long-term repairs. It is best to replace the broken flange with a new one to ensure a secure and leak-free connection.
3. Removing the Old Flange:
Before installing a new flange, you need to remove the old, broken one. Start by shutting off the water supply to the toilet and draining any remaining water from the tank and bowl. Unscrew the nuts that hold the toilet bowl in place using an adjustable wrench and carefully lift the toilet off the flange. If the old flange is screwed or glued onto the concrete floor, you may need to use a hacksaw or reciprocating saw to cut it away.
FAQ: Can I reuse my old flange if it’s only partially broken?
Answer: It is generally not recommended to reuse a broken flange as it may compromise the stability and integrity of your toilet installation. It is best to install a new flange for a reliable and long-lasting solution.
4. Cleaning and Preparing the Area:
Once the old flange has been removed, thoroughly clean the area around the drainpipe and prepare it for the installation of the new flange. Use a wire brush or scraper to remove any debris, residue, or old wax ring from both the drainpipe and concrete floor. Ensure that the surface is clean, dry, and free of any loose material before proceeding.
FAQ: Do I need to remove all traces of old wax ring Before installing a new flange?
Answer: Yes, it is important to remove all traces of the old wax ring before installing a new flange. Any remaining wax can prevent a proper seal and may lead to leaks. Use a scraper or putty knife to remove the old wax ring completely from both the drainpipe and the bottom of the toilet bowl.
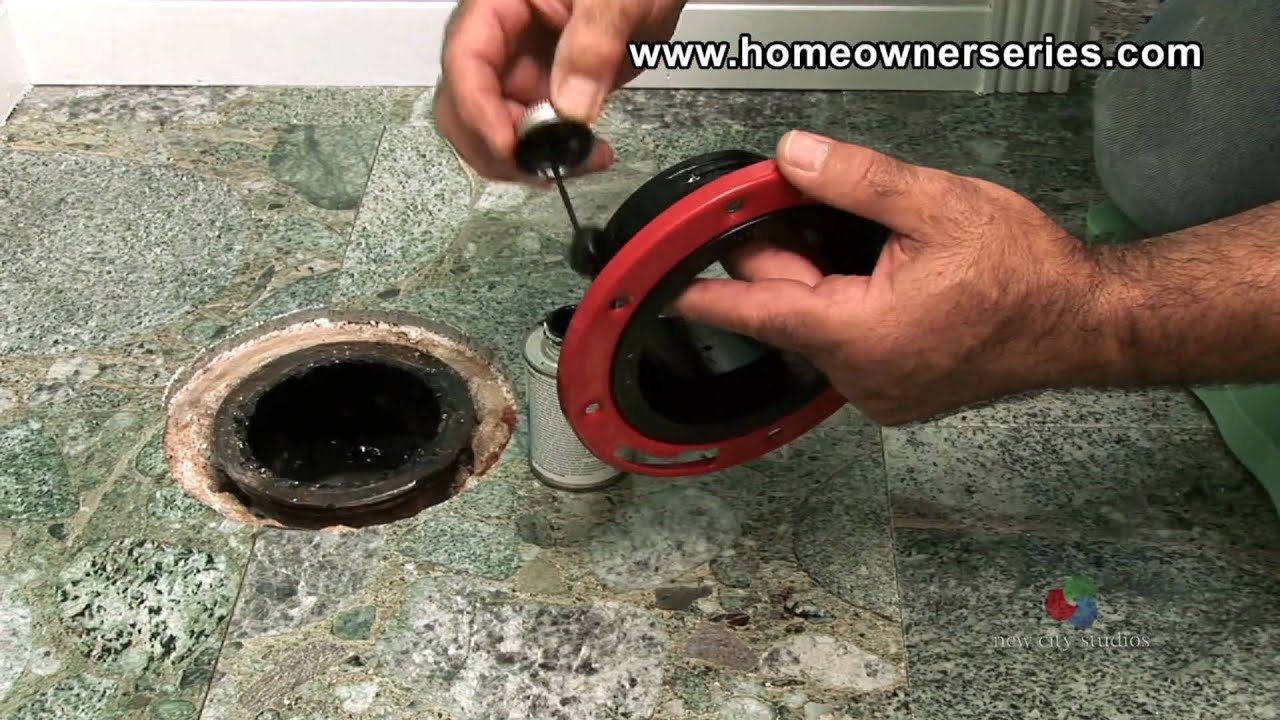
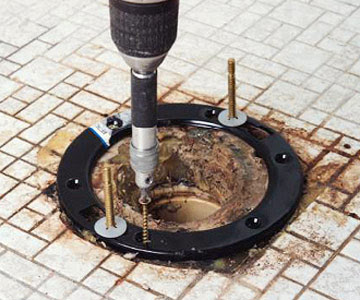
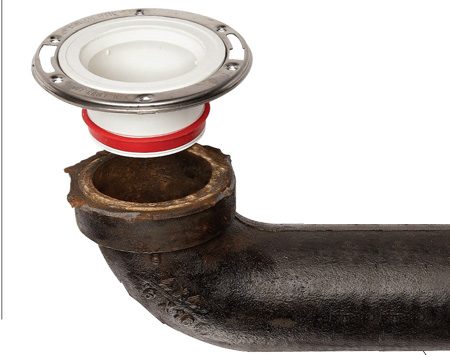
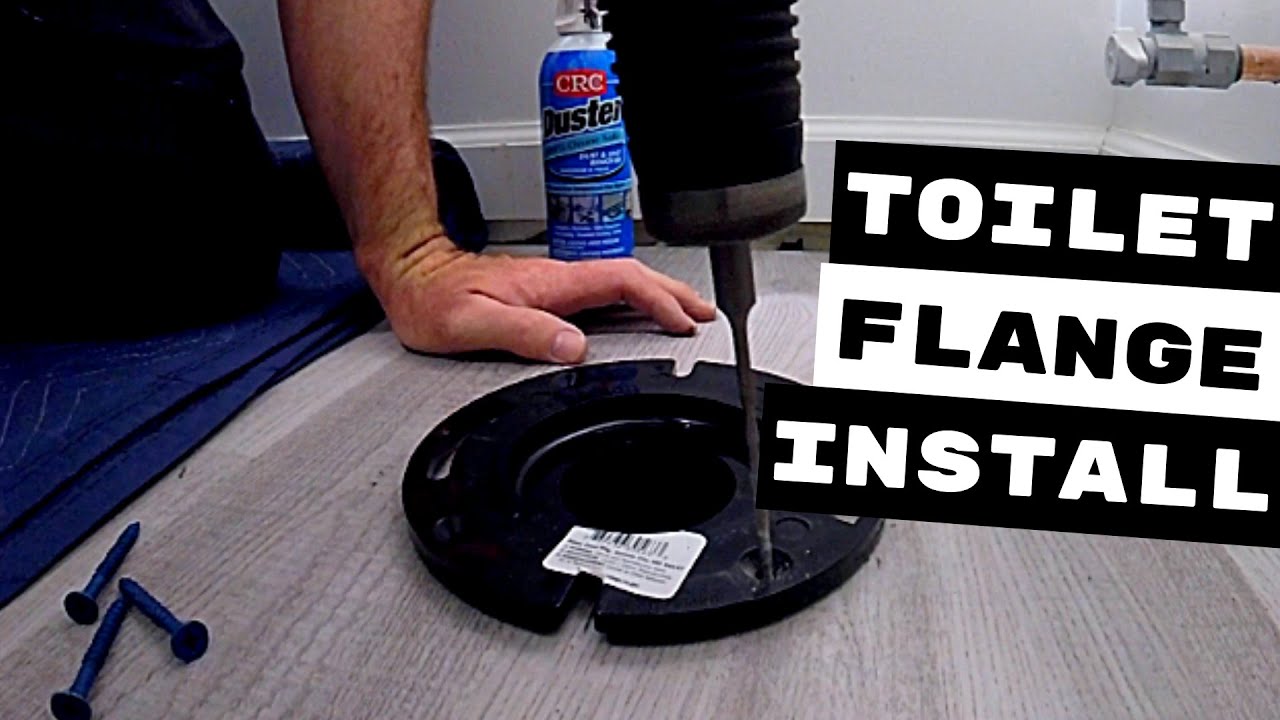
5. Installing the New Flange:
Place the new flange over the drainpipe, aligning it with the screw holes on the floor. If necessary, use a hammer drill with a masonry bit to create new anchor bolt holes in the concrete. Insert the anchor bolts into the holes and tighten them securely. Apply a layer of epoxy adhesive around the base of the flange for added stability (optional). Place a new wax ring onto the flange, ensuring that it is centered and evenly compressed. Carefully lower the toilet bowl onto the wax ring, aligning it with the flange and anchor bolts. Gently press down on the bowl to create a proper seal.
FAQ: Can I install a new flange without using epoxy adhesive?
Answer: While epoxy adhesive can provide additional stability, it is not necessary for installing a new flange. The wax ring should provide enough sealing and stability for normal toilet use. However, if you want extra security, you can apply a layer of epoxy adhesive before placing the wax ring.
6. Reattaching the Toilet Bowl:
Using an adjustable wrench, reattach and tighten the nuts onto the anchor bolts to secure the toilet bowl in place. Take care not to overtighten as this can crack or damage the toilet bowl. Once properly tightened, reconnect the water supply line to the fill valve and turn on the water. Check for any leaks around the base of the toilet and ensure that it is stable and level.
FAQ: How tight should I tighten the nuts onto the anchor bolts?
Answer: It is important to tighten the nuts securely but avoid overtightening as this can cause damage to your toilet bowl. Use an adjustable wrench to tighten until snug, and then give an additional quarter turn to ensure a secure connection.
7. Finishing Touches:
Once the toilet bowl is securely reattached and there are no leaks, apply a concrete patching compound around the base of the flange to fill any gaps or cracks in the concrete floor. Smooth out the compound with a putty knife or trowel and allow it to dry according to the manufacturer’s instructions. Finally, clean up any excess adhesive, debris, or tools from the work area and dispose of them properly.
FAQ: How long does it take for concrete patching compound to dry?
Answer: The drying time for concrete patching compound can vary depending on the product and environmental conditions. It is best to refer to the manufacturer’s instructions for specific drying times. Generally, it may take several hours or overnight for the compound to fully dry and cure.
By following these steps and guidelines, you can effectively repair a broken toilet flange and ensure a secure and leak-free toilet installation. If you are unsure or uncomfortable with performing this repair yourself, it is always recommended to seek professional assistance.