Plywood Garage Floor

Related Images about Plywood Garage Floor
Best 60+ Modern Garage Design Photos And Ideas – Dwell

You are able to additionally touch up spots which become much too dirty or perhaps tarnished in period. Others choose to use a mat to cover their work area, and some prefer the appearance of a mat that entails all areas of the floor space. The advantage of flexible garage flooring is you are able to obtain a large automobile over it without breaking or perhaps cracking the floor.
HOW TO LEVEL A SUBFLOOR FOR A HARDWOOD FLOOR INSTALLATION Deluxe Art Floor

The fact however is that the epoxy garage floor solution requires no more knowledge than what’s required to pain a wall structure. Floor mats are good to go after installing them on the floors. Rubber garage flooring or perhaps an epoxy coating is durable. Your special tastes will be respected as you are able to individualize the way you coat your floor. Garage flooring doesn’t need to be old fashioned.
Pin on Interior decorative concrete and metallic epoxy coatings.

Some of the floors are more affordable to invest in and some cheaper to set up. Is money the largest concern? Are you installing the flooring yourself? Are tools as well as parts likely to affect the garage floors covering? Coating the garage floor of yours with this epoxy material can help safeguard it out of cracking, weathering, oil spills and various other types of moisture that may threaten to wear and length of use of your garage floor.
WoodChips-Recreational Garage-Seamless-Flooring – Torginol, Inc.

Board and Batton wall DIY. Used very thin sanded plywood to cover drywall texture. #

Putting up plywood ‘planks’ on my garage wall – YouTube

Garage Floor Ideas Canada : G-Floor 8.5 ft. x 24 ft. Coin Slate Grey Commercial Grade / See

Installing a floor for storage above detached garage? – Home Improvement Stack Exchange
Sub-floor Installation Tips from Georgia-Pacific – YouTube
Diy Garage Cabinets Plans Home Design Ideas Garage storage cabinets, Diy garage cabinets

Remodelaholic Plywood 101: Best Plywood Tips for Successful DIY Projects

Plywood Floor Stenciled Chalk Paint Hometalk – Get in The Trailer

Tool Shed Plans Free MyOutdoorPlans Free Woodworking Plans and Projects, DIY Shed, Wooden

Pp Garage Flooring – Buy Garage Floor,Pvc Garage Flooring,Interlocking Garage Flooring Product
Related Posts:
- Valspar Garage Floor
- Self Levelling Garage Floor Paint
- Valspar Epoxy Garage Floor Paint
- Garage Floor With Flakes
- Garage Floor Sealer Vs Epoxy
- Bondall Garage Floor Paint Review
- How To Polish Concrete Garage Floor
- Garage Floor Paint Do It Yourself
- Drymate Garage Floor Mat Review
- Modular Interlocking Garage Floor Tiles
Title: Transforming Your Garage with a Plywood Garage Floor: A Comprehensive Guide
Introduction:
A garage is not just a space to park your car; it can also serve as a versatile workshop, storage area, or even an extra living space. However, many garages have unsightly concrete floors that are prone to cracks, stains, and an overall uninviting appearance. That’s where a plywood garage floor comes in. This innovative solution not only enhances the aesthetic appeal of your garage but also provides a durable and functional surface for various activities. In this comprehensive guide, we will explore the benefits, installation process, maintenance tips, and frequently asked questions regarding plywood garage floors.
I. Benefits of a Plywood Garage Floor:
A plywood garage floor offers numerous advantages that make it an ideal choice for homeowners looking to upgrade their garages.
1. Enhanced Durability: Plywood is renowned for its strength and durability. When properly installed, it can withstand heavy loads and resist everyday wear and tear associated with vehicles, tools, and machinery.
2. Improved Insulation: Unlike traditional concrete floors that tend to be cold and unwelcoming, plywood acts as an insulator, providing a warmer surface for your garage. This added insulation can help regulate the temperature inside the garage and reduce energy consumption.
3. Versatile Surface: Plywood provides a smooth surface that is perfect for various activities such as woodworking projects, exercise routines, or simply creating an organized storage space. Its versatility allows you to easily customize your garage according to your needs.
4. Easy Installation: Installing a plywood garage floor is relatively straightforward and can be completed as a do-it-yourself project with the right tools and materials. This makes it a cost-effective option compared to other flooring alternatives.
FAQs:
Q1: Is plywood suitable for heavy vehicles like trucks or SUVs?
A1: Yes, plywood is strong enough to support heavy vehicles when properly installed. However, it is advisable to use thicker plywood (3/4 inch or more) and ensure proper joist spacing to handle the added weight.
Q2: Can I install a plywood garage floor over an existing concrete floor?
A2: Yes, plywood can be installed directly on top of a concrete floor. However, it is crucial to address any moisture issues by using a vapor barrier or sealing the concrete before installation.
II. Installation Process:
Now that we’ve explored the benefits of a plywood garage floor, let’s delve into the step-by-step installation process.
1. Prepare the Garage: Start by clearing out your garage and removing any obstacles or debris. Sweep or vacuum the area thoroughly to ensure a clean surface for installation.
2. Measure and Plan: Measure the dimensions of your garage to determine the amount of plywood required. Consider any specific areas where you may want to allocate additional space for workbenches, storage, or other purposes.
3. Acquire Materials: Purchase high-quality plywood sheets that are specifically designed for flooring applications. Opt for pressure-treated or marine-grade plywood for enhanced durability and resistance to moisture.
4. Install Vapor Barrier: If your garage floor tends to have moisture issues, it is essential to install a vapor barrier before laying the plywood. This protective layer prevents moisture from seeping through and damaging the wood.
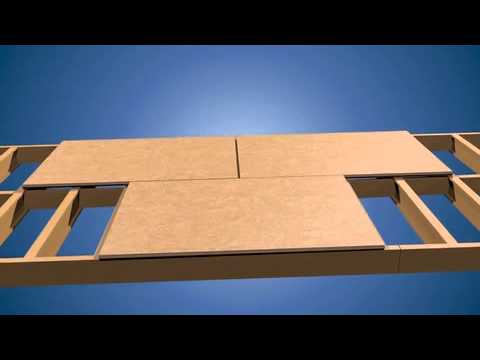
5. Lay the Plywood: Start by positioning the first sheet of plywood against one wall, leaving a small gap for expansion (approximately 1/8 inch). Secure it in place using screws or nails, ensuring it Is level and flush with the wall. Repeat this process for the remaining sheets, leaving a small gap between each sheet for expansion as well.
6. Secure the Plywood: Use screws or nails to secure the plywood to the floor joists or concrete floor, making sure to drive them in at regular intervals along the edges and through the center of each sheet. This will ensure that the plywood is securely fastened and won’t shift or move over time.
7. Fill Gaps and Holes: Inspect the plywood for any gaps or holes and fill them with wood filler or putty. Smooth out the surface using a putty knife and allow it to dry completely before proceeding.
8. Sand and Finish: Once the wood filler is dry, use sandpaper to smooth out any rough edges or imperfections on the plywood surface. You can also apply a coat of paint or stain to enhance its appearance and protect it from moisture damage.
9. Add Finishing Touches: Consider adding skirting boards or molding around the edges of the garage floor to give it a polished look. This can also help protect the edges of the plywood from wear and tear.
10. Enjoy Your New Plywood Garage Floor: Once all these steps are completed, you can start utilizing your new plywood garage floor for various activities while enjoying its added insulation and versatility.
Remember, it’s essential to follow proper safety precautions when installing a plywood garage floor, such as wearing protective gear and using appropriate tools. If you’re unsure about any step in the process, consult a professional for guidance to ensure a successful installation.