Installing Tile On Uneven Concrete Floor

Related Images about Installing Tile On Uneven Concrete Floor
How To Remove Tile From A Concrete Floor (Do This!) – Upgraded Home

With concrete flooring, after the floors are actually laid, they're polished to a substantial gloss and remaining on display. Those most enthusiastic about establishing eco sustainable houses have been among the first to embrace polished concrete floors, and also with valid reason. Warehouses and basements are the perfect applications for polished concrete floor.
Before you tile fix uneven floors Concrete bathroom, Concrete floors, Uneven floor

There are several ways to approach cleaning concrete floor, based on its look, whether it centrally located inside or maybe outside, if the concrete has been sealed and its current state of cleanliness. Polished concrete floors today has been just about the most popular options in each and every home as well as business constructions.
Tile vs Concrete: Best Floor Materials Info Captain

Along with this, among the best qualities of concrete flooring is its trouble free cleaning characteristic in which the particles of dust can be easily mopped. Even though many don't look at a concrete floor in the home of theirs for the worry of it being too cold, the opposite is actually true. For everyday regime, a soft broom or dust mop is very effective.
Guide How To Remove Tile From Concrete Floor – Alliance Flooring Directory

How to Level a Subfloor Leveling floor, Flooring, Self leveling floor

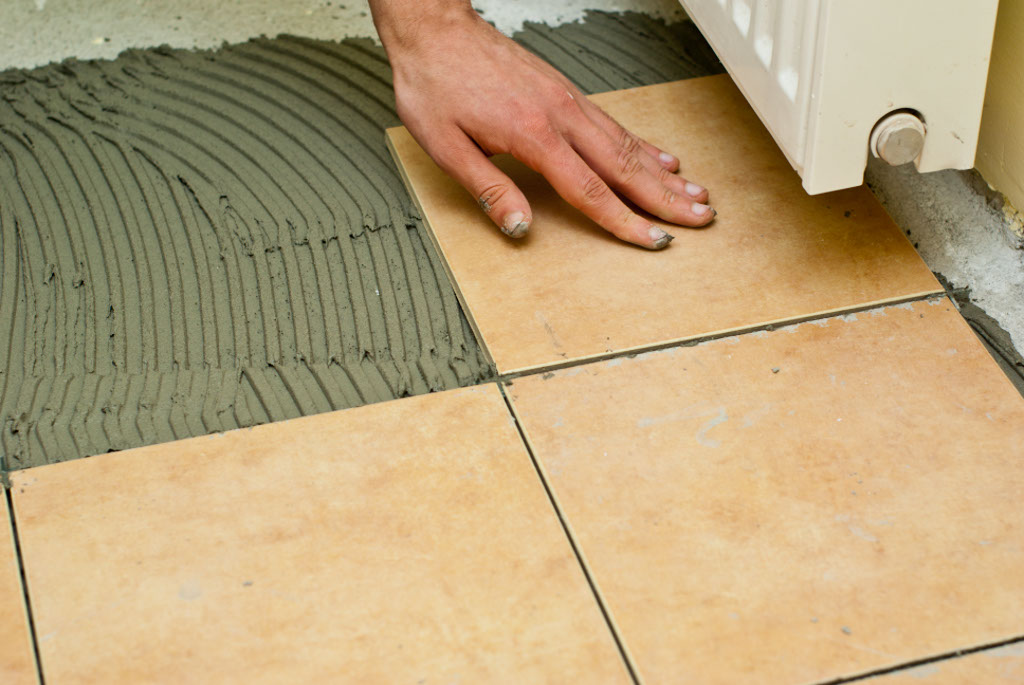
How to tile a concrete floor HowToSpecialist – How to Build, Step by Step DIY Plans
Avoid 5 Common DIY Mistakes for a Professional Stacked Stone Finish

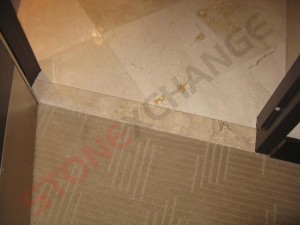
Installing Marble Thresholds
How To Add Floor Trim, Transitions, and Reducers Young House Love
![]()
How To Level Cement Floor For Tile Floor Tiles

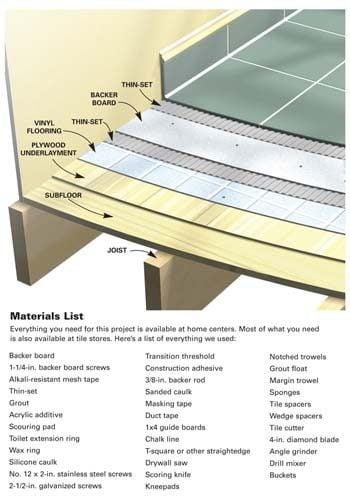
Concrete Floor Layers devilangel-kidz
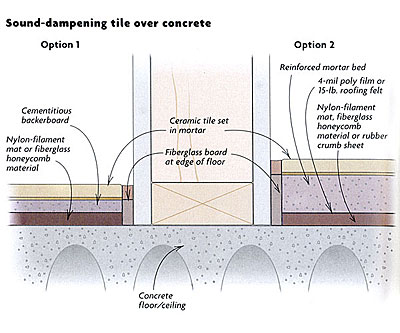
Sound-dampening ceramic tile over a concrete floor – Fine Homebuilding
Removing Tile From Concrete Floor – Flooring – DIY Chatroom Home Improvement Forum

Transition Threshold Molding – Walesfootprint.org – Walesfootprint.org
Related Posts:
- Interior Concrete Floor Paint Ideas
- Concrete Floors In Homes Cost
- Level Concrete Floor With Plywood
- Concrete Floor Construction For Underfloor Heating
- Stained Concrete Floors In Basement
- Polished Concrete Floor Crack Repair
- Concrete Floor With Insulation
- Acid Stained Concrete Floors Pictures
- Installing Underfloor Heating On Existing Concrete Floor
- How Much Is Concrete Flooring
Installing Tile On Uneven Concrete Floor
Introduction:
When it comes to installing tile on an uneven concrete floor, it can be a challenging task. Uneven floors can lead to cracked tiles, uneven surfaces, and an overall poor installation. However, with the right tools, techniques, and knowledge, it is possible to achieve a successful tile installation on an uneven concrete floor. In this article, we will discuss step-by-step instructions for installing tile on an uneven concrete floor, along with FAQs and detailed answers to common concerns.
1. Assessing the Concrete Floor:
Before beginning the tile installation process, it is crucial to assess the condition of the concrete floor. Check for any cracks, dips, or high spots that may need to be addressed before proceeding. Use a level or straightedge to identify any areas that are significantly uneven. This initial assessment will help determine the extent of preparation required for a successful tile installation.
FAQ: How do I know if my concrete floor is too uneven for tile installation?
Answer: If you notice significant dips or high spots exceeding 1/4 inch over a 10-foot span, your concrete floor may be too uneven for direct tile installation. In such cases, additional steps will be needed to level the surface properly.
2. Leveling the Concrete Floor:
If your concrete floor is found to be too uneven, it is essential to level it before installing the tile. Several methods can be used to level a concrete floor, including self-leveling compounds and mortar beds.
a) Self-Leveling Compounds:
Self-leveling compounds are a popular choice for leveling uneven concrete floors. These compounds are liquid-like and flow evenly over the surface, filling in low spots and creating a smooth, level base for tile installation.
– Clean the concrete floor thoroughly by removing any dust or debris.
– Fill any large cracks or holes using patching compound.
– Prime the surface with a bonding agent to enhance adhesion.
– Mix the self-leveling compound according to the manufacturer’s instructions.
– Pour the compound onto the floor and spread it evenly using a trowel or squeegee.
– Allow the compound to dry and cure as per the manufacturer’s recommendations.
FAQ: How long does it take for self-leveling compound to dry?
Answer: The drying time for self-leveling compounds can vary depending on various factors, such as temperature and humidity. Typically, it takes around 24 to 48 hours for the compound to dry completely. It is crucial to follow the manufacturer’s instructions for specific drying times.
b) Mortar Beds:
Another method for leveling an uneven concrete floor is by using mortar beds. This method involves applying a layer of mortar over the entire surface, filling in low spots and creating a level base.
– Clean the concrete floor thoroughly, removing any dirt or debris.
– Apply a bonding agent or primer to enhance adhesion between the concrete and mortar.
– Mix a batch of thin-set mortar according to the manufacturer’s instructions.
– Apply a layer of mortar using a trowel, ensuring even coverage across the entire surface.
– Use a straightedge or level to smooth and level the mortar bed.
– Allow the mortar bed to dry and cure as per the manufacturer’s recommendations.
FAQ: Can I use regular concrete mix instead of thin-set mortar for leveling?
Answer: It is not recommended to use regular concrete mix for leveling purposes. Thin-set mortar is specifically designed for tile installations and provides better adhesion and durability. Regular concrete mix may Not bond properly with the tile and can lead to unevenness or cracking in the long run. It is best to use thin-set mortar for leveling concrete floors before tile installation. Using self-leveling compounds or mortar beds are two common methods for leveling an uneven concrete floor before tile installation. Self-leveling compounds are liquid-like and flow evenly over the surface, filling in low spots and creating a smooth, level base. On the other hand, mortar beds involve applying a layer of mortar over the entire surface to fill in low spots and create a level base.
For self-leveling compounds:
1. Clean the concrete floor thoroughly by removing any dust or debris.
2. Fill any large cracks or holes using patching compound.
3. Prime the surface with a bonding agent to enhance adhesion.
4. Mix the self-leveling compound according to the manufacturer’s instructions.
5. Pour the compound onto the floor and spread it evenly using a trowel or squeegee.
6. Allow the compound to dry and cure as per the manufacturer’s recommendations.
For mortar beds:
1. Clean the concrete floor thoroughly, removing any dirt or debris.
2. Apply a bonding agent or primer to enhance adhesion between the concrete and mortar.
3. Mix a batch of thin-set mortar according to the manufacturer’s instructions.
4. Apply a layer of mortar using a trowel, ensuring even coverage across the entire surface.
5. Use a straightedge or level to smooth and level the mortar bed.
6. Allow the mortar bed to dry and cure as per the manufacturer’s recommendations.
It is important to follow the manufacturer’s instructions for drying times and curing processes for both self-leveling compounds and mortar beds.
In terms of using regular concrete mix instead of thin-set mortar for leveling, it is not recommended. Thin-set mortar is specifically designed for tile installations and provides better adhesion and durability. Regular concrete mix may not bond properly with the tile and can lead to unevenness or cracking in the long run. It is best to use thin-set mortar for leveling concrete floors before tile installation.
The drying time for self-leveling compounds can vary depending on factors such as temperature and humidity. Typically, it takes around 24 to 48 hours for the compound to dry completely. It is crucial to follow the manufacturer’s instructions for specific drying times.