How To Stagger Laminate Flooring Joints

Related Images about How To Stagger Laminate Flooring Joints
How to Stagger Vinyl Plank Flooring 2020 Home Flooring Pros
This’s great, because laminates cannot be sanded and refinished to renew their beauty as hardwoods could. If perhaps you use a portion of scrap that you’ve left over, you can use this as a marker for the depth that you have to trim the doorframe. This may lead to disappointment and a loss of cash. Always look into many aspects while choosing. As a matter of fact, I have yet to locate one.
How to Lay Laminate Flooring in One Day
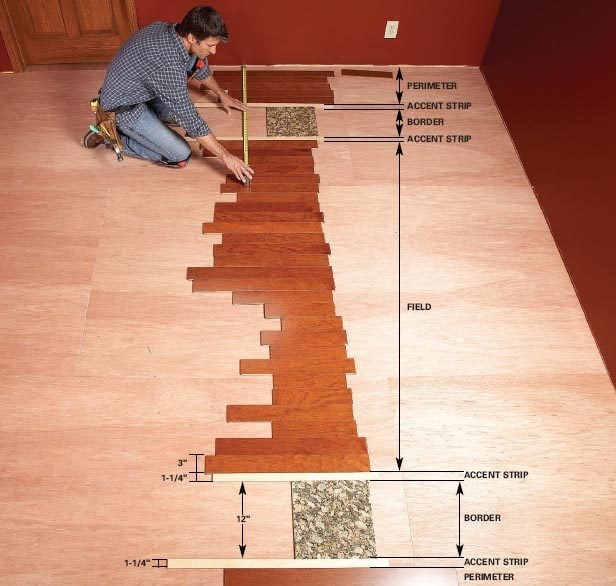
/Installing-Laminate-Stagger-Joints-56a49e453df78cf772834b1f.JPG)
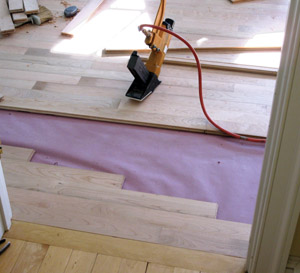
Laminate flooring is normally installed on a foam padding within a frame that you put into place around the outside of the home just before installation. A third choice is a glue-less laminate with a strategy which snaps the tongue and groove in concert, locking the floor into position. So, it’s not surprising that it would look and feel exactly like actual wood. Attach the transition pieces in doorways and level changes.
How To Stagger Laminate Flooring – How To Install A Laminate Floor Stanley Tools / Laminate
/Installing-Laminate-Stagger-Joints-56a49e453df78cf772834b1f.JPG)
You are going to need to use a putty blade for the prep work along with a floor scraper to remove the entire last residue coming from the floor. Why? Because, the same as other floor, their laminates are virtually proof from fading. Installing laminate floors is a very good do-it-yourself project that could be done by virtually everyone at any home setting. Since it is gaining popularity, the price of laminate floors has started to decline.
stagger_joints_600x294.jpg (600×294) M A T E R I A L S Pinterest

Hardwood Flooring Tips From a Pro – Extreme How To
Laminate Floor Separating at Joints The Money Pit
How To Stagger Hardwood Flooring MyCoffeepot.Org

DIY Laminate Floor Installation – Extreme How To
How To Stagger Wood Plank Floors Floor Roma

Laminate Flooring: How To Layout Laminate Flooring Pattern
BYGGTJÄNST – CLEANOMAX

How Far Do You Stagger the Joints in Hardwood Flooring? eHow

Laminate Flooring: Easy Lift Laminate Flooring
How to Lay Laminate Flooring in One Day
:max_bytes(150000):strip_icc()/Installing-Laminate-Flooring-Layout-56a49e463df78cf772834b22.JPG)
Related Posts:
- Select Surfaces Click Laminate Flooring Canyon Oak
- Kaindl Laminate Flooring Installation
- Curly Walnut Laminate Flooring
- Laminate Flooring Lumber Liquidators Reviews
- Laminate Flooring 8mm Sale
- Can You Have Laminate Flooring On Stairs
- Laminate Flooring On Concrete Base
- Pergo Golden Butternut Laminate Flooring
- Ceramic Tile Vs Laminate Flooring In Basement
- Laminate Flooring Shoe Molding
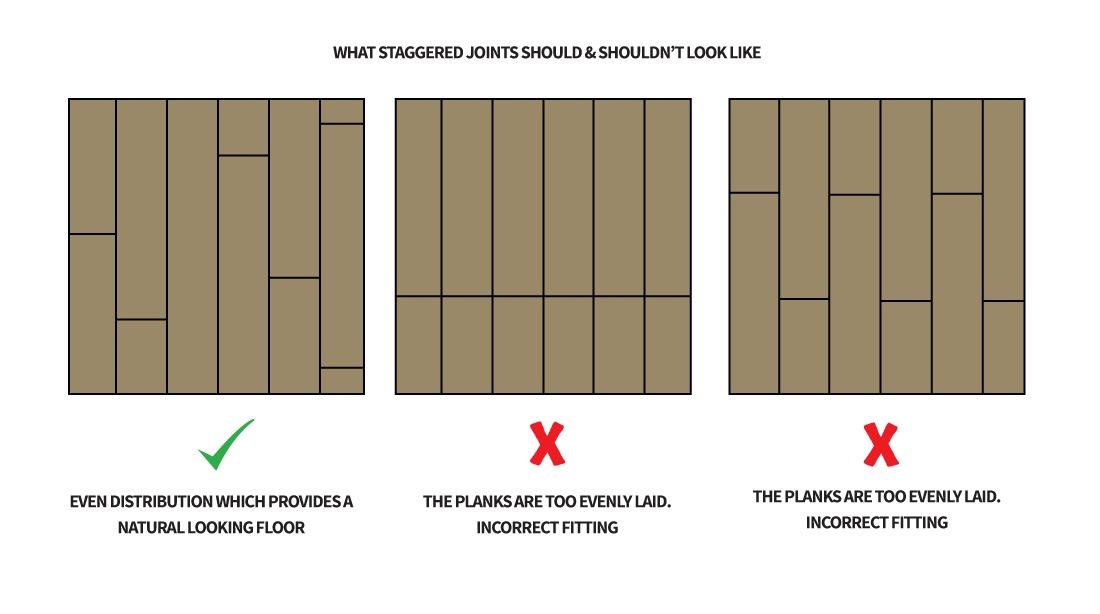
Staggering laminate flooring joints is an important step in the installation process that can greatly impact the overall look and durability of your floors. By properly staggering the joints, you can prevent weak spots and create a more visually appealing finish. In this article, we will discuss the importance of staggering laminate flooring joints and provide a step-by-step guide on how to do it correctly.
Why Stagger Laminate Flooring Joints?
Staggering laminate flooring joints is essential for several reasons. First and foremost, it helps to distribute weight and pressure evenly across the floor, reducing the likelihood of damage or buckling. Additionally, staggering the joints creates a more seamless appearance, as it prevents repetitive patterns from forming in the floorboards. This can make your floors look more natural and visually appealing.
How to Stagger Laminate Flooring Joints
1. Start with a Full-Length Plank
When beginning a new row of laminate flooring, start with a full-length plank. This will help to establish a solid foundation for the rest of the row and ensure that your joints are properly staggered.
2. Cut the First Plank in Half
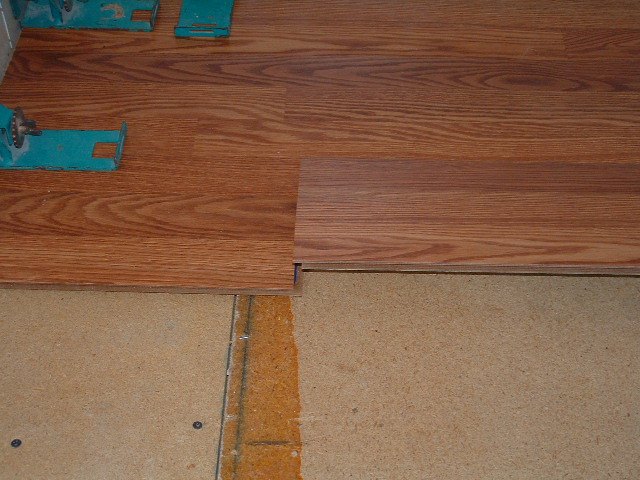
For the second plank in the row, cut it in half lengthwise using a saw or utility knife. This will create a staggered joint with the first plank and help to prevent weak spots in the flooring.
3. Begin Each Row with a Different Length Plank
As you continue laying rows of laminate flooring, be sure to start each new row with a different length plank. This will help to stagger the joints and create a more natural-looking finish.
4. Maintain Random Lengths
To achieve a truly staggered look, it’s important to maintain random lengths throughout the installation process. Avoid creating patterns or repeating lengths, as this can detract from the overall appearance of the floor.
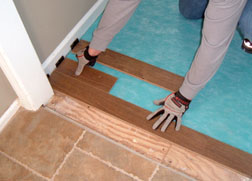
5. Use Spacers
When installing laminate flooring, be sure to use spacers between the planks and walls to allow for expansion and contraction. This will help to prevent buckling and ensure that your joints remain properly staggered.
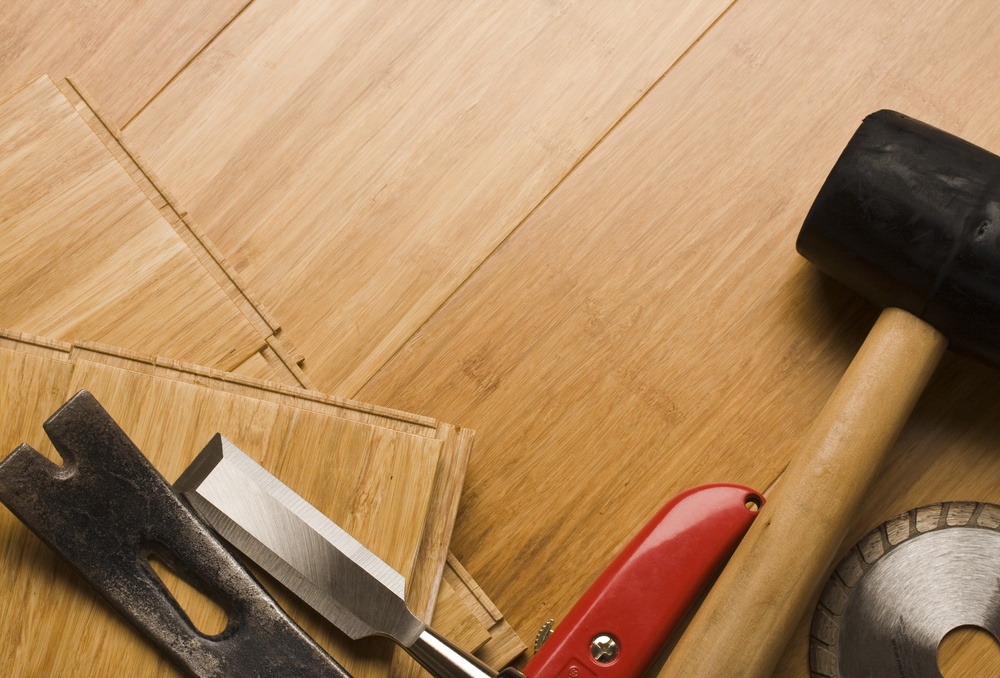
6. Check for Gaps
After laying each row of laminate flooring, check for gaps between the planks. If you notice any gaps, gently tap the planks together using a tapping block and mallet to close them up.
7. Continue Staggering Joints
Continue staggering the joints as you work your way across the room, following the same process outlined above. Be sure to double-check your work periodically to ensure that all joints are properly staggered.
FAQs:
Q: Can I install laminate flooring without staggering the joints?
A: While it is technically possible to install laminate flooring without staggering the joints, this can lead to weak spots in the floor and an unattractive finish. It is highly recommended to stagger the joints for both structural integrity and visual appeal.
Q: How much should I stagger laminate flooring joints?
A: The general rule of thumb is to stagger laminate flooring joints by at least 12 inches for optimal results. However, some manufacturers may recommend specific guidelines for their products, so be sure to consult their instructions before beginning installation.
Q: What tools do I need to stagger laminate flooring joints?
A: To stagger laminate flooring joints, you will need basic tools such as a saw or utility knife for cutting planks, spacers for maintaining proper spacing, and a tapping block and mallet for closing gaps between planks.
In conclusion, staggering laminate flooring joints is an important step in ensuring both Structural integrity and visual appeal. By following the steps outlined above and using the right tools, you can create a professional-looking finish that will stand the test of time. Remember to maintain random lengths, use spacers, and check for gaps regularly to achieve the best results. If you have any further questions or concerns, consult the manufacturer’s instructions or seek advice from a professional installer.
Remember, proper installation is key to ensuring the longevity and durability of your laminate flooring. By taking the time to stagger joints correctly, you can enjoy a beautiful and functional floor for years to come. If you have any doubts or concerns during the installation process, don’t hesitate to seek help from a professional installer. With a little attention to detail and the right tools, you can achieve a stunning finish that will enhance any space in your home.