How To Install Radiant Heat In Bathroom Floor
Related Images about How To Install Radiant Heat In Bathroom Floor
5 Benefits of Installing Radiant Floor Heating in Your Bathroom – Dynamic Air Heating and Cooling

As for tiles for the bathroom of yours, you should put porcelain at the upper part of the listing of yours. But, at an affordable $3 – ten dolars a square foot, fitted, it is a big way for bathroom flooring. They are available in a large array of colors and you can effortlessly mix and match or perhaps arrange them in patterns that are different.
Best Flooring for Radiant Heat Systems
/Installing-Radiant-Heating-System-122019977-58692a833df78ce2c389fd2c.jpg)
They come in shapes which are several, sizes as well as styles. Safety is also another aspect to look into. Another sort of vinyl come about with felt backing. Tiles in single strong colors impose some limitations on creativity. Vinyl flooring is not the main option for a bathroom simply since they're considered unfashionable.
Electric radiant heating for bathrooms Heated floors, My home design, Bathroom flooring

While cheap & typical vinyl are functional, pricier ones come with deep colors and prints and can be laid out inside patterns to give your bathroom a chic and cool look. You frequently go barefoot in the bathroom, for instance, thus the sense of the floor of its can be just as important as the way that it appears. If you're looking for a bold appearance, go in for floor tiles with bold prints and bright colors and patterns.
22 best Underfloor Heating images on Pinterest Floors, Flooring and Underfloor heating

Installing Radiant Floor Heat – This Old House
/cdn.vox-cdn.com/uploads/chorus_image/image/65890279/iStock_980072098.7.jpg)
Radiant Floor Heating: Electric vs. Hydronic – Jeff King and Company: Award Winning Green

Install In-Floor Heating and Keep Your Toes Warm This Winter Heated floors, Radiant floor

How to Install Heated Floors? Warmup Blog
The Best Flooring for Radiant Heating

Hydronic Radiant Heating – Concrete Application Hydronic radiant heat, Heated concrete floor

Benefits of Radiant Heating for Bathroom Floors Angie’s List

How To Warm Up A Cold Bathroom
Bathroom remodel – electric radiant floor heating? Terry Love Plumbing Advice & Remodel DIY

How to Install a 240 Volt Electric Baseboard Heater
/Cadet-baseboard-heater-56d26bb95f9b5879cc872f8c.jpg)
Related Posts:
- Bathroom Floor Tiles Price
- Cement Tile For Bathroom Floor
- Bathroom Floor Sky Painting
- Caught Me On The Bathroom Floor
- Heated Tile Floor Cost Per Square Foot
- Dirty Bathroom Floor
- Replace Bathroom Floor And Subfloor
- How To Make Bathroom Floor Waterproof
- Easy Bathroom Flooring Options
- Cheap Bathroom Floor Cabinets
How To Install Radiant Heat In Bathroom Floor
Introduction:
Installing radiant heat in a bathroom floor can be a game-changer when it comes to comfort and luxury. Imagine stepping onto warm tiles on a chilly winter morning, or drying off after a shower without the discomfort of cold feet. Radiant heat provides an efficient and effective way to keep your bathroom cozy all year round. In this article, we will guide you through the step-by-step process of installing radiant heat in your bathroom floor.
Section 1: Planning and Preparation
Before you embark on your radiant heat installation project, careful planning and preparation are essential. Here are the steps to follow:
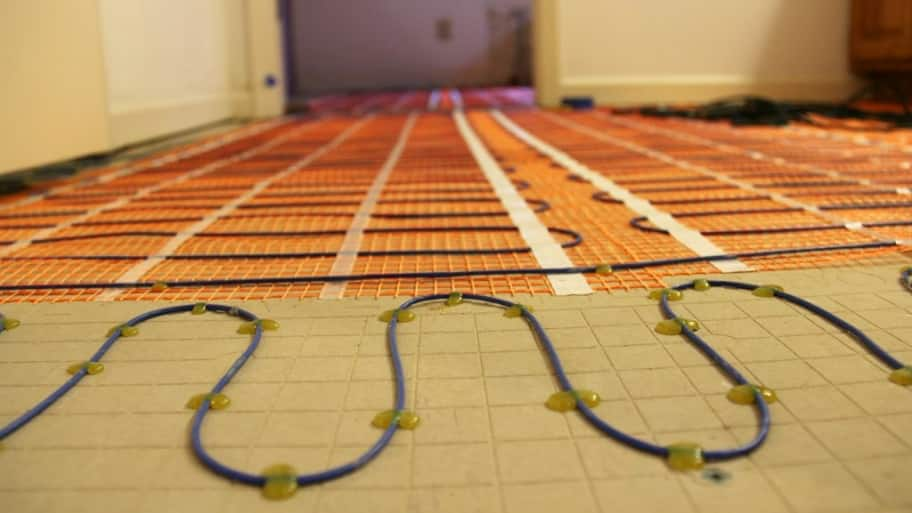
1. Determine the Heat Source: There are two common types of radiant heat systems for bathroom floors: electric systems and hydronic systems. Electric systems use heating cables or mats installed beneath the flooring, while hydronic systems use heated water flowing through pipes. Consider your budget, energy efficiency, and personal preferences to choose the right system for your bathroom.
2. Calculate Heat Load: It is crucial to determine the heat load required to effectively warm your bathroom floor. Factors such as room size, insulation, ceiling height, and desired temperature should be taken into account. You can consult a professional or use online calculators to determine the appropriate heat load for your bathroom.
3. Choose Flooring Materials: Different flooring materials respond differently to radiant heat. Materials such as ceramic or porcelain tiles, natural stone, or engineered wood work well with radiant heat systems. Avoid using carpet or vinyl flooring as they can inhibit heat transfer.
4. Prepare the Subfloor: Ensure that your subfloor is clean, dry, and level before installing radiant heat. Repair any cracks or uneven areas using appropriate products. If there are existing floor coverings, remove them carefully without damaging the subfloor.
Section 2: Installing Electric Radiant Heat Systems
Electric radiant heat systems are popular due to their ease of installation and cost-effectiveness. Here’s how to install electric radiant heat in your bathroom floor:
1. Lay Insulation: Install a layer of rigid foam insulation boards on the subfloor to prevent heat loss downward. This insulation also acts as a vapor barrier, preventing moisture from damaging the heating system.
2. Position Heating Cables or Mats: Carefully lay out the heating cables or mats according to the manufacturer’s instructions. Space them evenly, ensuring that they cover the entire bathroom floor area. Secure them using adhesive or staples recommended by the manufacturer.
3. Connect Thermostat: Install the thermostat in a convenient location and connect it to the heating system according to the manufacturer’s instructions. The thermostat allows you to control and program temperature settings for optimal comfort.
4. Test System Before Flooring Installation: Before proceeding with flooring installation, perform a thorough test of the radiant heating system. Ensure that all electrical connections are secure and functioning correctly. Use a multimeter to verify resistance readings and ensure even heat distribution across the floor.
Section 3: Installing Hydronic Radiant Heat Systems
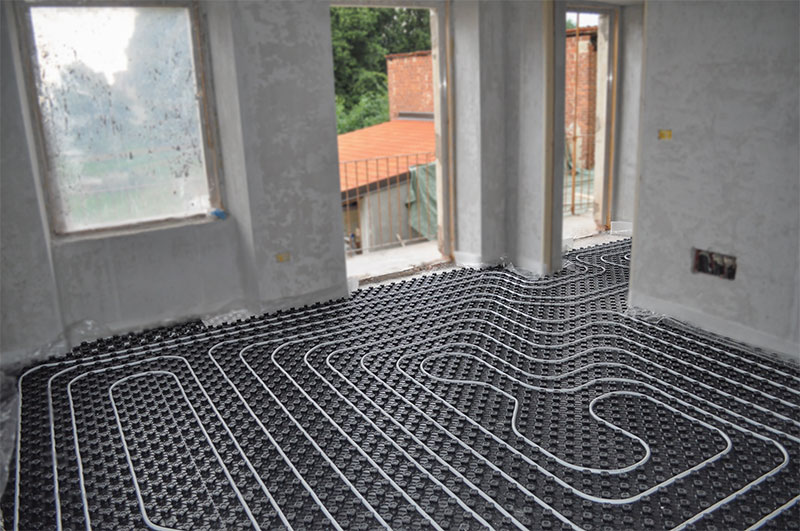
Hydronic radiant heat systems provide excellent comfort and energy efficiency, although their installation process can be more complex. Follow these steps to install hydronic radiant heat in your bathroom floor:
1. Prepare Piping Layout: Plan the layout of your hydronic piping system, considering factors such as pipe spacing, tubing size, and flow rate. Consult a professional or use software tools to design an efficient and effective system.
2. Install Subfloor Panels: Lay down plywood or OS B (oriented strand board) panels on the subfloor to create a smooth and stable surface for the piping. Secure the panels with screws, ensuring they are properly spaced to accommodate the piping layout.
3. Install Piping: Begin laying the hydronic piping according to your planned layout. Use a combination of flexible PEX tubing and aluminum heat transfer plates to maximize heat distribution. Secure the tubing using clips or staples recommended by the manufacturer.
4. Connect Manifold and Boiler: Install a manifold near the bathroom area to control the flow of hot water through the piping system. Connect the manifold to a boiler or other heat source using appropriate plumbing fittings and valves. Follow all safety guidelines and local codes when working with hot water systems.
5. Fill and Test System: Fill the piping system with water and ensure that there are no leaks. Use a pressure gauge to check for any pressure drops or fluctuations. Once filled, turn on the boiler and test the system for proper operation and heat distribution.
6. Install Flooring: After confirming that the hydronic radiant heating system is functioning correctly, you can proceed with installing your chosen flooring material over the subfloor.
Conclusion:
Installing radiant heat in your bathroom floor can provide enhanced comfort and energy efficiency. Whether you choose an electric or hydronic system, proper planning, preparation, and installation are crucial for optimal results. Consider consulting professionals or using online resources for further guidance specific to your project’s requirements.