How To Install Interlocking Vinyl Flooring
Related Images about How To Install Interlocking Vinyl Flooring
ProCore 16-Piece 5.75-in x 35.75-in Heirloom Oak Luxury Vinyl Plank Flooring Lowes.com in 2020

Resilient vinyl flooring is very versatile because it is now made to simulate the look of so many natural substrates. With a small amount of tender looking care, your sleek new floor is going to be in mint condition for years to come. Your hands and arms will be extremely grateful you did. In this article we will discuss some of these products that may help you decide whether they're a proper choice for the home of yours.
interlocking vinyl plank flooring
Modern technology has the capability to make the ordinary vinyl flooring of yours right into a luxurious one. The technique used to imprint the structure of the flooring is able to imitate numerous patterns such as wood grain, stone, marble and tile. Vinyl flooring can be bought in numerous forms. You may even have vinyl flooring with wood pattern in your bathroom or basement, regions that are a definite no-no for wood floors due to their closeness to water.
Shaw Matrix with Advance Flex Technology Cascade Walnut 5.90-in x 48.03-in Waterproof

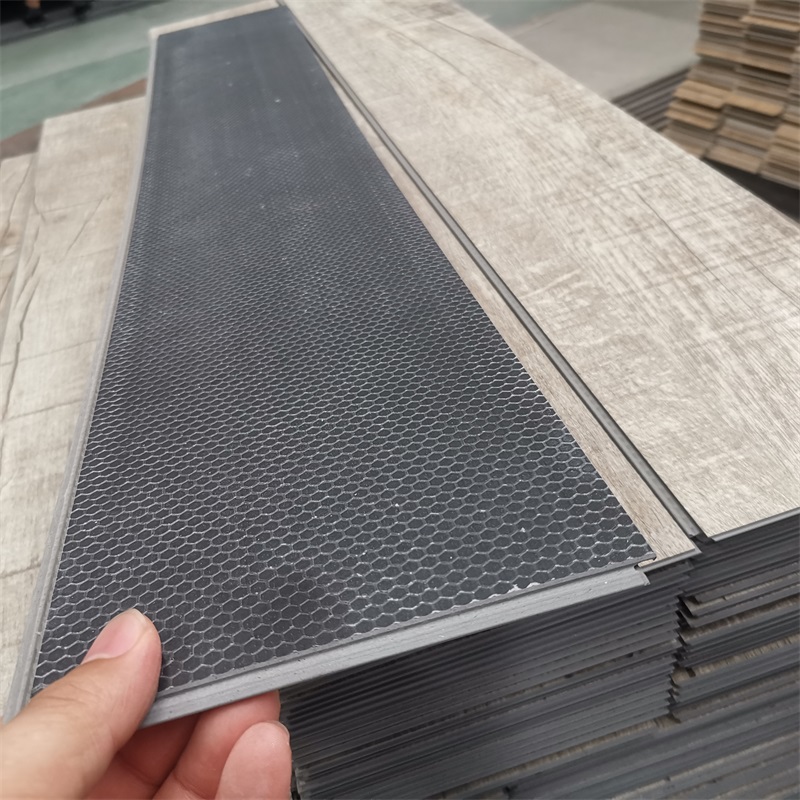
Therefore, you can get the hands of yours on anything, beginning from quite smooth to a little rough and all the way up to pebbled surfaces. The padded part of the vinyl is in the middle layer, between the wear layer and the backing. Vinyl flooring is more durable compared to the other flooring types. It is hard-wearing and tough so that you don't need to spend for the frequent maintenance of its.
China Best Interlocking Vinyl Flooring Manufacturers, Suppliers, Factory – AOXUE

Interlocking Vinyl Flooring – FLOOR

SMARTCORE Ultra Woodford Oak 5.91-in x 48.03-in Waterproof Interlocking Luxury Vinyl Plank

Wood Vinyl Top Interlocking Floor Tiles – Great for Basements – BlockTile Interlocking floor

Vinyl Interlocking Flooring Home Depot / How To Install Lifeproof Vinyl Flooring The Home Depot

How to Install Interlocking Laminate Flooring – DIY Home Repair

SMARTCORE Ultra Ultra Wide Thick Waterproof Interlocking Luxury (15.76-Sq ft) in the Vinyl Plank

SMARTCORE Ultra Richmond Oak Wide Thick Waterproof Interlocking Luxury (15.76-Sq ft) Lowes.com

Interlocking Vinyl Flooring – Discount Flooring Liquidators

Vinyl Interlocking Flooring Home Depot NIVAFLOORS.COM

Waterproof 3.0mm Wood Design Dry Back Vinyl flooring Tile – TopJoyFlooring

Related Posts:
- Pour Leveling Compound On Existing Vinyl Floor
- Vinyl Flooring Chennai Dealers
- Vinyl Flooring Fumes
- Prestige Vinyl Flooring
- Grass Design Vinyl Flooring
- Floral Pattern Vinyl Flooring
- 5mm Vinyl Flooring
- How To Remove Old Vinyl Flooring From Wood
- Luxury Vinyl Flooring
- Rustic Wood Vinyl Flooring
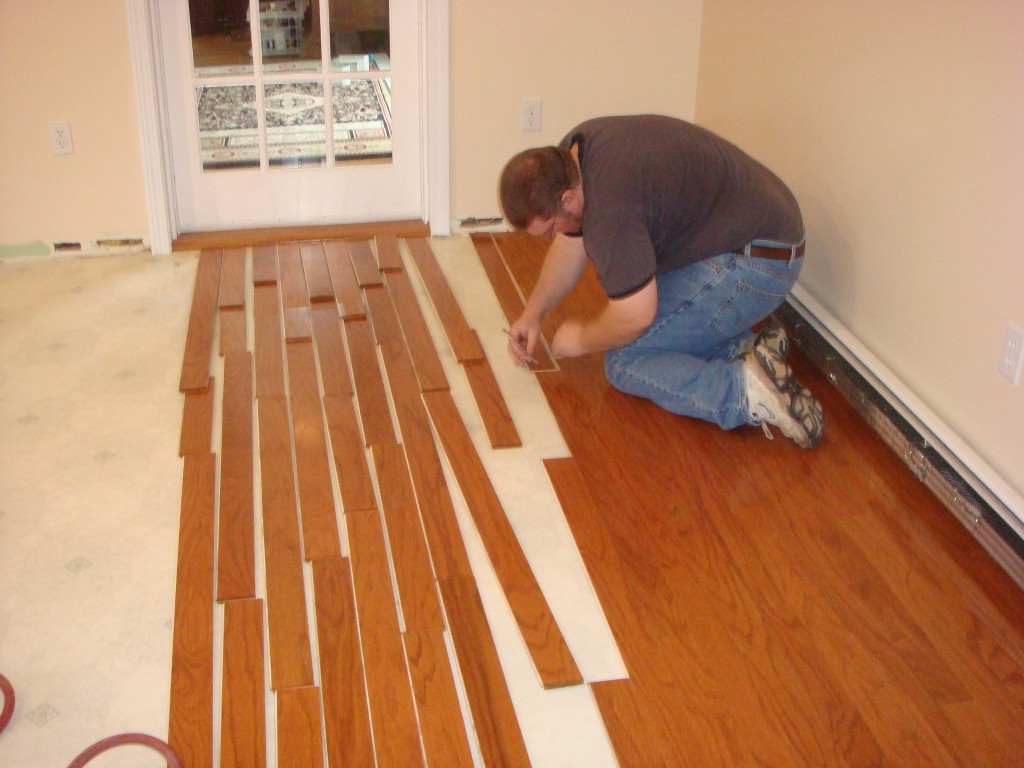
How to Install Interlocking Vinyl Flooring
Vinyl flooring has become increasingly popular over the years due to its durability, affordability, and easy installation process. Among the different types of vinyl flooring available, interlocking vinyl flooring stands out as a convenient option for homeowners who prefer a DIY approach. In this article, we will provide you with a step-by-step guide on how to install interlocking vinyl flooring, along with some frequently asked questions and their detailed answers.
1. Measure and Prepare the Space
Before you begin installing interlocking vinyl flooring, it is crucial to measure the space accurately and prepare it properly. Start by removing any existing flooring, such as carpet or tiles. Ensure that the subfloor is clean, dry, and level. If there are any imperfections or cracks on the subfloor, fix them before proceeding. Additionally, make sure to remove any baseboards or moldings along the perimeter of the room.
FAQ: Do I need to remove the baseboards before installing interlocking vinyl flooring?
Answer: While it is not necessary to remove the baseboards before installing interlocking vinyl flooring, it is recommended for a neater finish. However, if you choose not to remove them, you can install quarter-round molding or shoe molding after the vinyl flooring installation to cover the expansion gap.
2. Acclimate the Vinyl Flooring
Vinyl flooring can expand or contract depending on temperature and humidity levels. Therefore, it is essential to acclimate your interlocking vinyl flooring before installation. Place the boxes of vinyl planks in the room where they will be installed and let them sit for at least 48 hours. This allows the flooring to adjust to the temperature and humidity conditions of the space.
FAQ: Can I skip acclimating the vinyl flooring?
Answer: Acclimating vinyl flooring is highly recommended as it helps prevent issues like buckling or gaps later on. Skipping this step may result in an improper installation and potential problems with the flooring in the future.
3. Lay the Underlayment
Underlayment is an important layer that provides cushioning, sound absorption, and helps protect the vinyl flooring from any imperfections on the subfloor. Before laying the underlayment, ensure that the subfloor is clean and free of debris. Roll out the underlayment parallel to the longest wall of the room, allowing it to cover the entire area. Trim any excess underlayment using a utility knife.
FAQ: Is underlayment necessary for interlocking vinyl flooring?
Answer: While not all interlocking vinyl flooring requires an underlayment, it is generally recommended to use one for better comfort and noise reduction. However, check the manufacturer’s instructions to determine if underlayment is necessary for your specific vinyl flooring product.
4. Plan and Layout
Proper planning and layout are essential for a successful installation of interlocking vinyl flooring. Start by identifying the direction in which you want to lay the planks. It is commonly recommended to install them parallel to the longest wall in the room for a visually appealing result. Measure and mark a reference line along this wall, leaving some space for expansion.
Lay out a few rows of vinyl planks without locking them together to visualize how they will fit in the space. Make sure to stagger the end joints between rows, aiming for at least a 6-inch offset. This creates a more natural look and enhances overall stability.
FAQ: Can I install interlocking vinyl flooring in any direction?
Answer: While you can install Interlocking vinyl flooring in any direction, it is generally recommended to install them parallel to the longest wall in the room for a visually appealing result. However, the specific installation instructions provided by the manufacturer should always be followed. 5. Install the First Row
Start by laying the first row of vinyl planks along the reference line you marked earlier. Make sure to leave the expansion gap between the planks and the wall. To connect the planks, simply align the tongue of one plank with the groove of another and press them together until they lock in place. Use a tapping block and rubber mallet to ensure a tight fit.
FAQ: How do I create an expansion gap when installing interlocking vinyl flooring?
Answer: To create an expansion gap, place spacers along the edges of the wall before installing the first row of vinyl planks. These spacers will ensure that there is enough space left for expansion as the flooring adjusts to temperature and humidity changes.
6. Continue Installing Rows
Continue installing additional rows of vinyl planks, connecting them by aligning the tongue and groove and pressing them together firmly. Use a tapping block and rubber mallet as needed to ensure a snug fit. Remember to stagger the end joints between rows for stability and aesthetics.
FAQ: How do I cut vinyl planks to fit around obstacles?
Answer: Use a utility knife or a vinyl plank cutter to cut the planks to fit around obstacles such as door frames or corners. Measure and mark the area that needs to be cut, then score along the marked line with a utility knife. Bend the plank at the scored line, and it should snap cleanly. For more intricate cuts, use a vinyl plank cutter or jigsaw.
7. Continue Installation Until Completion
Continue installing rows of vinyl planks until you reach the opposite wall or complete the entire room. Remember to maintain the expansion gap along all edges.
8. Install Trim and Molding
After completing the installation of interlocking vinyl flooring, install trim or molding along walls, doorways, and transitions to give the flooring a finished look. Use appropriate tools such as a miter saw or coping saw to cut the trim or molding to the desired length and angle.
FAQ: How soon can I walk on newly installed interlocking vinyl flooring?
Answer: It is generally recommended to wait at least 24 hours before walking on newly installed interlocking vinyl flooring. This allows the adhesive or locking mechanism to fully set and ensures a more secure installation.
Remember to always refer to the manufacturer’s instructions for specific installation guidelines and recommendations for your particular interlocking vinyl flooring product.