Do It Yourself Tile Floor

Related Images about Do It Yourself Tile Floor
Stunning Victorian Bathroom With White Subway Tile, Beautiful Moroccan Tiles Along The Floor And

For that matter, natural stone such as marble and granite are actually on the additional conclusion of the spectrum – they crack actually easier compared to ceramic tile and shouldn't be used in settings where some excess deflection is actually possible. The floor tiles have to be sealed and periodically resealed with a commercially-available sealant in comparison to ceramic tiles which only have to have their grout lines sealed. Denver tile flooring will provide you with a huge assortment of tile.
Removing Tile Floor Tile floor, Ceramic floor tiles, Flooring

And compare their prices on which you are able to have cheaper rate for the marble tiles you select. Nip off the surface side area intelligently to a marked line and after that take out the basic lower sections at will. The truth is, they probably just knew it had to be done and told you about this at the coming of the project. You can purchase a system originating from a home improvement store for a single automobile garage, which could very easily set you returned $500 plus.
Shower Shower, Flooring, Tile floor

Tiles however are far simpler to install but garage area tile flooring does come with its very own pros pros and cons as we shall discover going ahead. And then, wipe the slim excess off the flooring and hang on at least twenty four hours to them to establish. Mosaic tile flooring is among the most loved variations because of the high level of creativity you can make use of in having them in your house.
Why you should use tiles for the floor? – Complex Time

7 Mistakes To Avoid When Choosing Floor Tiles For Home – Singapore Laminate Flooring

Blog – Duo Star Why should you invest in floors and tiling works for your home?

Gray Hexagon Tile with Gray Grout Laundry Room Laundry room, Laundry room/mudroom, Kitchen remodel

how to floor tiles work – YouTube

How to Install Bathroom Floor Tile how-tos DIY
The idea for the tiles on the floor.

Effective Tips On How To Choose Correct Tiles For Your Floor – IKT Kitchens

Top 70 Best Tile To Wood Floor Transition Ideas – Flooring Designs
![]()
25 New DIY Ways To Invest Your Pennies. Oddly Beautiful Craft!!

Marble Tile Installation: PRO or DIY?Learning Center

Related Posts:
- Commercial Porcelain Tile Flooring
- Ideas Covering Tile Floors
- Steam Mop For Hardwood And Tile Floors
- Shaw Vinyl Tile Flooring
- Herringbone Wood Look Tile Floor
- Chair Casters For Tile Floors
- Bona Mops For Tile Floors
- How Clean Porcelain Tile Floor
- How To Install Natural Stone Tile Flooring
- How Much To Install Tile Floor Per Square Foot
Do It Yourself Tile Floor: Everything You Need to Know
Installing tile flooring is a great way to add value and style to your home. It does require some skill and knowledge, however, so it’s important to take your time and do the job correctly. If you’re considering attempting a do it yourself tile floor project, here’s what you need to know.
Tools and Materials
Before starting a DIY tile floor project, it’s important to make sure you have all the necessary tools and materials on hand. You will need a wet saw, trowel, spacers, grout float, sponges, rubber mallet, level, tape measure, chalk line, utility knife, tile nippers and various adhesives. Additionally, you will need to purchase the tile itself. Make sure you purchase enough tile for the entire project plus an extra 10% in case of breakage or mistakes.
Preparing the Subfloor
Once you have all your tools and materials ready to go, it’s time to prepare the subfloor for the installation. Make sure the subfloor is clean and free of any debris or dust. Inspect the subfloor for any signs of damage or weakness that could affect the installation. If necessary, use a patching compound to repair any weak spots or cracks in the subfloor before continuing.
Laying Out the Tiles
Now that your subfloor is prepped and ready to go, it’s time to begin laying out your tiles. Start by measuring the room and making marks on the floor with a pencil that correspond with where each tile should go. Then use a chalk line to draw lines connecting these marks so that you have a guideline for where each tile should be placed.
Cutting Tiles
Next you will need to cut some of the tiles in order for them to fit properly in certain areas of the room. Place each individual tile on top of your cutting surface and use a wet saw or tile nippers to make precise cuts according to your measurements and lines drawn on the floor. It’s important to take your time when cutting tiles as even small mistakes can cause major problems down the line.
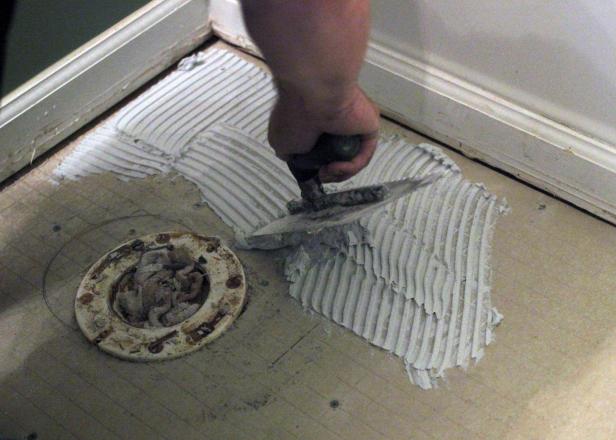
Applying Adhesive
Once all your tiles are cut and ready to go, it’s time to start applying adhesive. Use a trowel with notched teeth to apply an even layer of adhesive over each section of subfloor that you plan on tiling. Then press each individual tile into place using a rubber mallet if necessary in order ensure a tight fit between each piece of tile. Once all tiles are pressed into place make sure they are level using a leveler tool and make adjustments as needed until everything is even.
Grouting
After all tiles are securely in place it’s time for grouting. Begin by mixing up some grout according manufacturer instructions on the packaging then use a grout float to apply it into all gaps between each tile until everything is completely filled in with grout. Once applied let it sit for about 20 minutes then wipe away any excess grout with damp sponge before allowing it more time to dry completely overnight .
Finishing Touches
Once the grout has completely dried it’s time for the finishing touches. Inspect all tiles to make sure they are clean and free of any grout residue then apply a sealer to help protect them from water and stains. Finally, enjoy your brand new tile floor! To help ensure the longevity of your new floor, make sure to clean it regularly and reseal every few years.
What type of tile is best for a do-it-yourself tile floor?
Ceramic or porcelain tile is generally considered the best tile for do-it-yourselfers. These tiles are durable, relatively easy to install, and come in a wide variety of colors and styles.What tools are needed for a do-it-yourself tile floor?
-Tape measure-Tile cutter
-Notched trowel
-Tile spacers
-Grout float
-Rubber grout float
-Grout sponge
-Bucket
-Mortar mix
-Caulk gun
-Silicone caulk
-Tile adhesive or mortar
-Masking tape
-Protective eyewear and gloves
What methods are used to install tile flooring?
1. Dry set method: This involves laying the tile onto an adhesive that has been spread directly onto the subfloor.2. Mortar bed method: This method involves applying a thick layer of mortar to the subfloor and then laying the tiles on top.
3. Thinset adhesive method: This involves spreading a thin layer of thinset adhesive directly onto the subfloor before laying down tiles.
4. Self-adhesive tile method: This involves peeling off the backing from pre-glued tiles and pressing them into place on the subfloor.
What tools are needed to install tile flooring?
Tools needed to install tile flooring include:• Notched trowel
• Tile cutter
• Wet saw
• Grout float
• Sponge
• Safety glasses
• Knee pads
• Level
• Chalk line
• Tape measure